MySQL is a relational database management system based on the Structured Query Language (SQL), the most widely used language for accessing and managing database records. Under the GNU license, MySQL is open-source and free software. Oracle Corporation backs it up.
This blog talks about the 3 steps you can follow to configure and seamlessly set up a Docker MySQL Container for your business requirements. It also gives a brief introduction to Docker and MySQL before diving into the advantages, Docker Install MySQL process, configuration, updating, and management tips for a Docker MySQL Container.
How to Install the Docker MySQL Container?
Here are the steps you can follow to install the Dockerhub MySQL Container:
Are you looking for an easy way to replicate your MySQL data? A fully managed No-code Data Pipeline platform like Hevo helps you integrate data from 150+ data sources (including 40+ Free Data Sources) like MySQL to a destination of your choice in real time in an effortless manner.
The platform supports various destinations including Amazon Redshift, Firebolt, Snowflake Data Warehouses; Databricks, Amazon S3 Data Lakes; MySQL, SQL Server, TokuDB, DynamoDB, PostgreSQL databases to name a few.
Simplify your Data Analysis with Hevo today!
SIGN UP HERE FOR A 14-DAY FREE TRIAL!
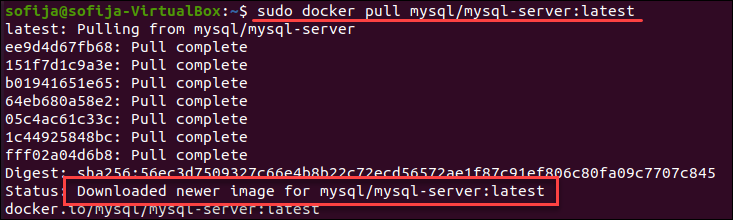
Step 1: Pull the Docker Image for MySQL
- Begin by taking the appropriate Docker Image for MySQL. You can either download a specific version or choose the latest release, as depicted in the following code snippet:
sudo docker pull mysql/mysql-server:latest
- However, if you want a specific version of MySQL, you need to amend the latest value with the version number as shown in the figure below:
 Amend Latest Value with Version Number
- Finally, you need to verify that the image is now stored locally by listing the downloaded Docker images:
sudo docker images
- The output should contain mysql/mysql-server as a constituent of the listed images:
 Output
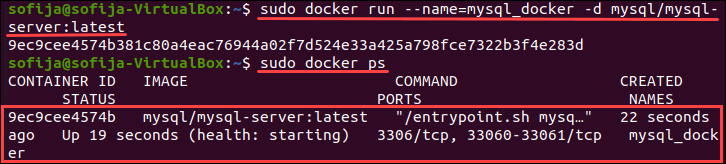
Step 2: Deploy and Start the MySQL Container
- Now that you have extracted the image from the Docker repository, you can move on to deploying a new MySQL Container with the following code snippet:
sudo docker run --name=[container_name] -d [image_tag_name]
- Amend the [container_name] with your desired name. If you don’t give a name, Docker chooses one for you, by default.
- The -d option tells Docker to run the Container as a Service in the background. Next, amend the [image_tag_name] with the name of the image you downloaded in the previous step. For this example, you can create a container called mysql_docker with the latest version tag based on the following code snippet:
sudo docker run --name=[container_name] -d mysql/mysql-server:latest
- To check if the Docker MySQL Container is running use the following command:
docker ps
- With this command, you can view the newly created container listed in the output. This consists of essential container details, for instance, the status of the virtual environment. The status is modified from health: starting to healthy, once you have completed the setup process.
 Command to View Newly Created Container
Step 3: Connect with the Docker MySQL Container
- Before you go about connecting the MySQL Server Container with the host, you need to ensure that the MySQL Client Package has been installed with the following command:
apt-get install mysql-client
- Next, you need to open the log files for the Docker MySQL Container to find the root password you generated:
sudo docker logs [container_name]
- Now that you have the mysql_docker container run the following command:
sudo docker logs mysql_docker
- Look through the output and locate the line ‘[Entrypoint] GENERATED ROOT PASSWORD:’. Next, copy and paste the password into a text editor or a notepad for future use.
 Copy and Paste Password into Text Editor
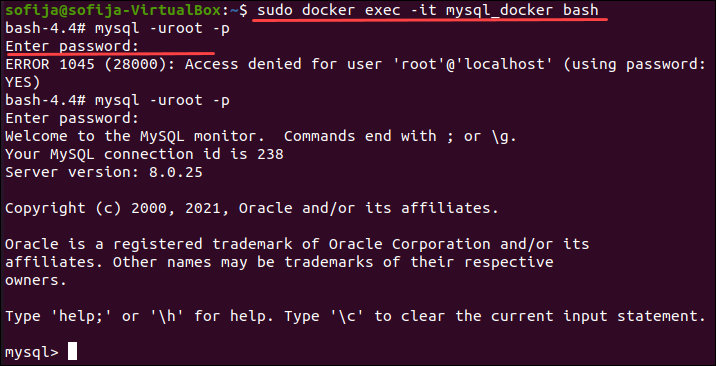
- Next, hover to the bash shell of the MySQL Container and type out the following command:
sudo docker exec -it [container_name] bash
- For the container you created as an example, you can run this command:
sudo docker -it mysql_docker bash
- Give the root password that you just copied from the logs file whenever you get prompted. This completes the connection process from the MySQL Client to the Server.
 Give Root Password
- Having completed the previous step for the Docker MySQL Container setup, change the root server password to protect your sensitive information with this snippet:
mysql> ALTER USER 'root'@'localhost' IDENTIFIED BY '[newpassword]';
- For the above command, replace the [newpassword] clause with a desired strong password.
 Provide a Strong Password
How to Configure Your Docker MySQL Container?
If you wish to take a peek at the configuration of your Docker MySQL Container, you can find it in the ‘/etc/mysql/my.cnf=’ directory. If you want to modify the configuration, you need to create an alternative config file on the host machine and mount them inside the Docker MySQL Container.
- Step 1: Create a new directory on the host machine with this code snippet:
sudo mkdir -p /root/docker/[container_name]/conf.d
- Step 2: Next, you need to create a customized MySQL config file within that directory with the following command:
sudo nano /root/docker/[container_name]/conf.d/my-custom.cnf
- Step 3: Having opened the file, you can add lines with your desired configuration. For instance, if you want to increment the maximum number of connections to 250 (as opposed to the default value 151), you can add the following lines to the configuration file:
[mysqld]
max_connections=250
 Maximum Connections
You can change the MySQL instance’s configuration by passing one or more environment variables to the docker run command line when starting the MySQL image. If you start the container with a data directory that already contains a database, none of the variables below will have any effect: any pre-existing database will be ignored when the container starts.
You can change the MySQL instance’s configuration by passing one or more environment variables to the docker run command line when starting the MySQL image. If you start the container with a data directory that already contains a database, none of the variables below will have any effect: any pre-existing database will be ignored when the container starts.
MYSQL ROOT PASSWORD
This is a required variable that specifies the password for the MySQL root superuser account. It was set to my-secret-pw in the example above.
MYSQL DATABASE
This variable is optional and allows you to name a database that will be created when the image starts up. If a user/password was provided (see below), that user will be granted superuser access to this database (corresponding to GRANT ALL).
MYSQL USER and MYSQL PASSWORD are two variables in MySQL.
These variables are optional and are used to create a new user and set the password for that user. For the database specified by the MYSQL DATABASE variable, this user will be granted superuser permissions (see above). Both variables must be present in order to create a user.
It’s worth noting that this mechanism isn’t required to create the root superuser; that user is automatically created with the password specified by the MYSQL ROOT PASSWORD variable.
MYSQL ALLOW EMPTY PASSWORD
This is a non-mandatory variable. Set to a non-empty value, such as yes, to allow the container to start with the root user’s password blank. NOTE: If you set this variable to yes, your MySQL instance will be completely unprotected, allowing anyone to gain complete superuser access.
MYSQL RANDOM ROOT PASSWORD
This is a non-mandatory variable. To generate a random initial password for the root user, set it to a non-empty value, such as yes (using pwgen). The root password is generated and printed to stdout (GENERATED ROOT PASSWORD: …..).
MYSQL ONETIME PASSWORD
Once init is complete, the root (not the user specified in MYSQL USER!) user is marked as expired, requiring a password change on the first login. This setting is activated by any non-empty value. NOTE: This feature is only available in MySQL 5.6 and higher. When using this option with MySQL 5.5, an appropriate error will be thrown during initialization.
MYSQL INITDB SKIP TZINFO
The timezone data required for the CONVERT TZ() function is loaded automatically by default by the entry point script. Any non-empty value disables timezone loading if it is not required.
- Step 4: Save the file and exit. Now, for the changes to take effect, you need to rerun the MySQL Container after removing it. For this, the container leverages a combination of configuration settings from the newly created file along with the default config files. You can run the Docker MySQL Container and map the volume path with the following code snippet:
docker run
--detach
--name=[container_name]
--env="MYSQL_ROOT_PASSWORD=[my_password]"
--publish 6603:3306
--volume=/root/docker/[container_name]/conf.d:/etc/mysql/conf.d
mysql
- Step 5: Now, to check if the Docker MySQL Container has loaded the configuration from the host, you can run the following command:
mysql -uroot -pmypassword -h127.0.0.1 -P6603 -e 'show global variables like "max_connections"';
- Step 6: You can now check the maximum number of connections for your Docker MySQL Container. It should show 250 connections.
Bonus Setup: How to Connect Host Machine with Docker MySQL?
- Step 1: Start the container and map it to a local port to begin the process. In this step, you will be mapping the port from the Docker Container to a Docker MySQL port on localhost which can be used to connect to MySQL. First, you need to remove the container you created with the following set of commands:
docker stop learn-mysql-docker
docker rm learn-mysql-docker
- Step 2: After removing the container, you can start a new container with the same MySQL Image and map the Docker port to the localhost port. You can do this with the help of the following command:
docker run -p 13306:3306 --name mysql-docker-local -eMYSQL_ROOT_PASSWORD=Password -d mysql:latest
- Step 3: Next, you need to make sure that there are no errors after the above command has been executed. If everything works out fine, the above command will print out a generated container ID.
- Step 4: After starting the container, you need to connect to MySQL from localhost by either using a GUI tool like MySQL Workbench or the command line.
- Step 5: For the command line, you can use this snippet to get things started:
mysql --host=127.0.0.1 --port=13306 -u root -p
- Step 6: After you’ve executed the command, you will see that you are connected to a Docker-based MySQL instance. You can run any command to check if it’s working fine.
Managing your Docker MySQL Container
- Step 1: Docker stores data in its internal volume by default, so to check the location of Docker’s internal volumes you can use the following code snippet:
sudo docker inspect [container_name]
- Step 2: For this command, you can see the /var/lib/mysql mounted in the internal volume.
 Check Location of Docker’s Internal Volume
- Step 3: You can even modify the location of the data directory and make one that exists on the host of your Docker MySQL Container instead. Having a volume outside the container lets other tools and applications access the volumes when required.
- Step 4: Next, you need to find an appropriate volume of the host and make a data directory on it with the following code snippet:
sudo mkdir -p /storage/docker/mysql-data
- Step 5: After executing the previous command, start the container again by mounting the previously created directory with this command:
docker run
--detach
--name=[container_name]
--env="MYSQL_ROOT_PASSWORD=my_password"
--publish 6603:3306
--volume=/root/docker/[container_name]/conf.d:/etc/mysql/conf.d
--volume=/storage/docker/mysql-data:/var/lib/mysql
mysql
- Step 6: If you inspect the container, you should be able to peek at the data within Docker MySQL Container and realize that it’s stored on the host system now.
sudo docker inspect [container_name]
Here are a few essential components to help you manage your Docker Compose MySQL Container:
How to Start the Container for MySQL?
The code snippet you can use to start the Docker MySQL Container is as follows:
sudo docker start [container_name]
How to Restart the Container for MySQL?
The code snippet you can use to restart the Docker MySQL Container is as follows:
sudo docker restart [container_name]
How to Stop the Container for MySQL?
The code snippet you can use to stop the Docker MySQL Container is as follows:
sudo docker stop [container_name]
How to Delete Your Docker MySQL Container?
If you wish to delete the Docker MySQL Container, you need to make sure that you’ve stopped it first. Next, you can remove the Docker Container with the following code snippet:
sudo docker rm [container_name]
 Remove Docker Container
How to Upgrade your Dockerised MySQL Container?
To upgrade a Docker MySQL Container, you can follow the steps mentioned below:
- Step 1: Stop the MySQL Server for this instance using the code snippet mentioned below:
docker stop mysql57
- Step 2: Next, download the MySQL 8.0 Server Docker image and make sure that you have the right tag for MySQL 8.0.
- Step 3: Start a new MySQL 8.0 Docker Container with the old configuration and server data that have been applied on the host. Run the following command for the same:
docker run --name=mysql80
   --mount type=bind,src=/path-on-host-machine/my.cnf,dst=/etc/my.cnf
   --mount type=bind,src=/path-on-host-machine/datadir,dst=/var/lib/mysql
   -d mysql/mysql-server:8.0
- Step 4: Now, you need to wait for the server to finish startup. You can check the status of the server with the docker ps command.
- Step 5: For earlier versions of MySQL, you need to run the mysql_upgrade utility in the MySQL 8.0 Server Container as follows:
docker exec -it mysql80 mysql_upgrade -uroot -p
- Step 6: Enter the root password for your old MySQL Server and finish the upgrade by restarting the MySQL Server Container as follows:
docker restart mysql80
Cautions
- Where to Store Data: Data is stored in a variety of ways by applications that run in Docker containers. Users of the MySQL images should become familiar with the options available, which include:
- Allow Docker to manage the storage of your database files on the host system by writing the database files to disc using its own internal volume management. This is the default setting, and it is simple and transparent to the user. The downside is that for tools and applications that run directly on the host system, such as outside containers, the files may be difficult to locate.
- Make a data directory on the host system (outside the container) and mount it to a directory that can be seen from inside the container. This places the database files in a well-known location on the host system, making them accessible to the host system’s tools and applications. The disadvantage is that the user must ensure that the directory exists and that the host system’s security mechanisms, such as directory permissions and other security mechanisms, are configured correctly.
The Docker documentation is a good place to start learning about the various storage options and variations, and there are a number of blogs and forum posts that discuss and offer advice in this area. For the latter option, we’ll just show the basic procedure here:
Create a data directory, such as /my/own/datadir, on a suitable volume on your host system.
Begin your mysql container as follows:
-v /my/own/datadir:/var/lib/mysql -e MYSQL ROOT PASSWORD=my-secret-pw -d docker run —name some-mysql mysql:tag
The -v /my/own/datadir:/var/lib/mysql part of the command mounts the underlying host system’s /my/own/datadir directory as /var/lib/mysql inside the container, where MySQL will write its data files by default.
- No Connections Until MySQL init Completes: A default database will be created if there is no database initialised when the container starts. While this is normal behavior, it means that it will not accept incoming connections until the initialization is complete. This could cause problems when using automation tools like docker-compose, which start multiple containers at the same time. If the application you’re trying to connect to MySQL doesn’t handle MySQL downtime or waiting for the service to start gracefully, a connect-retry loop may be required before the service starts. See WordPress or Bonita for an example of such an implementation in the official images.
- Usage Against an Existing Database: The $MYSQL ROOT PASSWORD variable should be omitted from the run command line if you start your mysql container instance with a data directory that already contains a database (specifically, a MySQL subdirectory); it will be ignored in any case, and the pre-existing database will not be changed.
- Running as an Arbitrary User: If you know your directory permissions are already set correctly (for example, if you’re running against an existing database, as described above), or if you need to run mysqld with a specific UID/GID, you can use this image with —user set to any value (other than root/0) to get the desired access/configuration:
$ mkdir data
$ ls -lnd data
drwxr-xr-x 2 1000 1000 4096 Aug 27 15:54 data
$ docker run -v "$PWD/data":/var/lib/mysql --user 1000:1000 --name some-mysql -e MYSQL_ROOT_PASSWORD=my-secret-pw -d mysql:tag
- Creating Database Dumps: The majority of standard tools will work, though their use may be a little convoluted in some cases to ensure access to the mysqld server. Using docker exec and running the tool from the same container, as shown below, is a simple way to ensure this:
$ docker exec some-mysql sh -c 'exec mysqldump --all-databases -uroot -p"$MYSQL_ROOT_PASSWORD"' > /some/path/on/your/host/all-databases.sql
- Restoring Data from Dump Files: For data recovery. You can use the -i flag with the docker exec command, as shown below:
$ docker exec -i some-mysql sh -c 'exec mysql -uroot -p"$MYSQL_ROOT_PASSWORD"' < /some/path/on/your/host/all-databases.sql
Before we wrap up, let’s understand the benefits and some use cases for MySQL in Docker.
What is the Advantage of Running a Docker MySQL Container?
By running a Docker MySQL Container, you are developing code with repeatable configuration and infrastructure, thus speeding up the development process considerably. A key point to note here is that Docker Images are generally small to begin with. You also get speedy delivery and shorter deployment for new application containers.
Another key benefit of running a Docker MySQL Container is straightforward maintenance. Whenever you containerize an application, it gets isolated from other apps running in the same system. So, since applications don’t intermix, it makes application maintenance that much easier.
The MySQL Operator for Kubernetes effectively teaches Kubernetes what it requires to run MySQL correctly. It educates Kubernetes on how to treat MySQL Clusters as a first-party resource type in Kubernetes’ API. It also helps Kubernetes understand how many nodes you might need to have a minimal HA cluster within your Kubernetes environment.
Use Cases for MySQL in Docker
- When you need to quickly bring up isolated database instances, MySQL in Docker works well in development and staging. You can benefit from the fast and easy starting of a database in Docker. Configuring a conventional MySQL installation in a full virtual machine takes much longer.
- Running MySQL locally on your host will have limitations when your work involves many applications simultaneously. Containers provide full separation of each system’s data and give a unique MySQL server configuration for each of them.
- When you have a demanding production environment, it’s better to go for a dedicated MySQL server. Why because Docker’s performance overheads can stack up in I/O-intensive workloads. Also, it makes the instance accessible to stakeholders unfamiliar with Docker.
Conclusion
This blog talks about the different steps you can follow to set up a Docker MySQL Container after a brief introduction to the salient features of MySQL and Docker. It also covers the advantages of leveraging Docker MySQL Containers and various handy management and configuration tips.
Extracting complex data from a diverse set of data sources to carry out an insightful analysis can be challenging, and this is where Hevo saves the day! Hevo offers a faster way to move data from Databases or SaaS applications like MySQL into your Data Warehouse to be visualized in a BI tool. Hevo is fully automated and, hence, does not require you to code.
Hevo is the only real-time ELT No-code Data Pipeline platform that cost-effectively automates data pipelines that are flexible to your needs. With integration with 150+ Data Sources (40+ free sources), we help you not only export data from sources & load data to the destinations but also transform & enrich your data, & make it analysis-ready. (edited)
Want to take Hevo for a spin?
SIGN UP and experience the feature-rich Hevo suite first hand. You can also have a look at the unbeatable pricing that will help you choose the right plan for your business needs.
Amit is a Content Marketing Manager at Hevo Data. He enjoys writing about SaaS products and modern data platforms, having authored over 200 articles on these subjects.