One of the benefits of storing huge datasets in data warehouses is that you can migrate data from one application to another when needed. Some database storage systems, such as Azure Blob Storage, are quite cost-efficient for storing vast amounts of data. However, if you want to analyze your data better, opt for cloud data warehouses like Snowflake, which have faster query processing capabilities.
Are you looking for a comprehensive Azure Blob Storage Snowflake tutorial? You have arrived at the right place! In this article, we will introduce you to two ways to migrate your data from Azure Blob Storage to Snowflake.
Azure Blob Storage Overview
This is a cloud-based object storage solution in the Microsoft ecosystem that can store vast amounts of unstructured data. The platform is optimized for creating data lakes, which can help you fulfill your various analytics needs.
You can access objects stored in your Azure Blob Storage account from anywhere worldwide through HTTP/HTTPS protocols using Azure Storage REST API, Azure CLI, Azure PowerShell, or Azure client libraries.
Snowflake Overview
Founded in 2012, Snowflake is a fully managed cloud data warehouse known for its data storage and analyzing capabilities. It can be hosted on one of the three cloud platforms: AWS, Microsoft Azure, and Google Cloud platform.
Snowflake can swiftly process SQL queries through its virtual warehouses, each of which consists of Massively Parallel Processing (MPP) compute clusters. The storage and compute layers are separate and independent, allowing users to pay only for the services they utilize.
Methods to Load Data from Azure Blob to Snowflake
Take a look at two detailed ways through which you can easily migrate data from Azure Blob Storage to Snowflake.
Method 1: Create an Azure Blob Storage Snowflake Pipeline With Hevo
Hevo is a real-time ELT data pipeline platform that cost-effectively automates no-code data pipelines that are flexible to your needs. With integrations to over 150+ data sources, you can extract and transform data according to your needs before loading it into your desired destination.
Benefits of Hevo
Before you connect Snowflake to Azure Blob Storage or any other data applications with Hevo, you must know some of Hevo’s top benefits and features.
- Intuitive User Interface: Hevo’s simple and intuitive user interface eliminates the need to hire technical staff to set up and manage your data pipelines.
- Incremental Data Load: Hevo allows real-time transfer of modified data from the source to the destination. To understand this feature better, let’s consider you make changes at the source. Hevo will automatically replicate those changes to the data at the destination, keeping the datasets up-to-date.
- Data Transformation: Hevo provides you with powerful Python-based and drag-and-drop transformations. This feature helps you prepare the datasets before migrating them to the destination.
Azure Blob to Snowflake Integration With Hevo: Setting up the Source
Take a look at the detailed steps to set up an Azure Blob to Snowflake ETL data pipeline in Hevo.
Prerequisites for Setting Azure Blob Storage as the Source of Your Pipeline
- An active Azure Blob Storage account.
- Create a storage account within the Blob Storage account. Under this storage account, you must create a container and add your data files and folders.
- Create a connection string with the required permissions.
- You must be assigned to one of the following roles in Hevo: Team Administrator, Pipeline Administrator, or Team Collaborator.
To know more about the prerequisites, you can read the Hevo documentation on Azure Blob Storage connector for further details.
Step 1: Create a Connection String to Authenticate your Azure Blob Storage Account on Hevo
- Log in to your Azure Blob Storage account and navigate to the Azure services section. Click on the All resources tab.
 Navigate to the All resources tab in Azure Blob Storage.
- Click on the storage account, which has the container of your data files. In the following image, we have used Azure Hevo Resource as an example for the storage account.
 Azure Hevo Resource storage account.
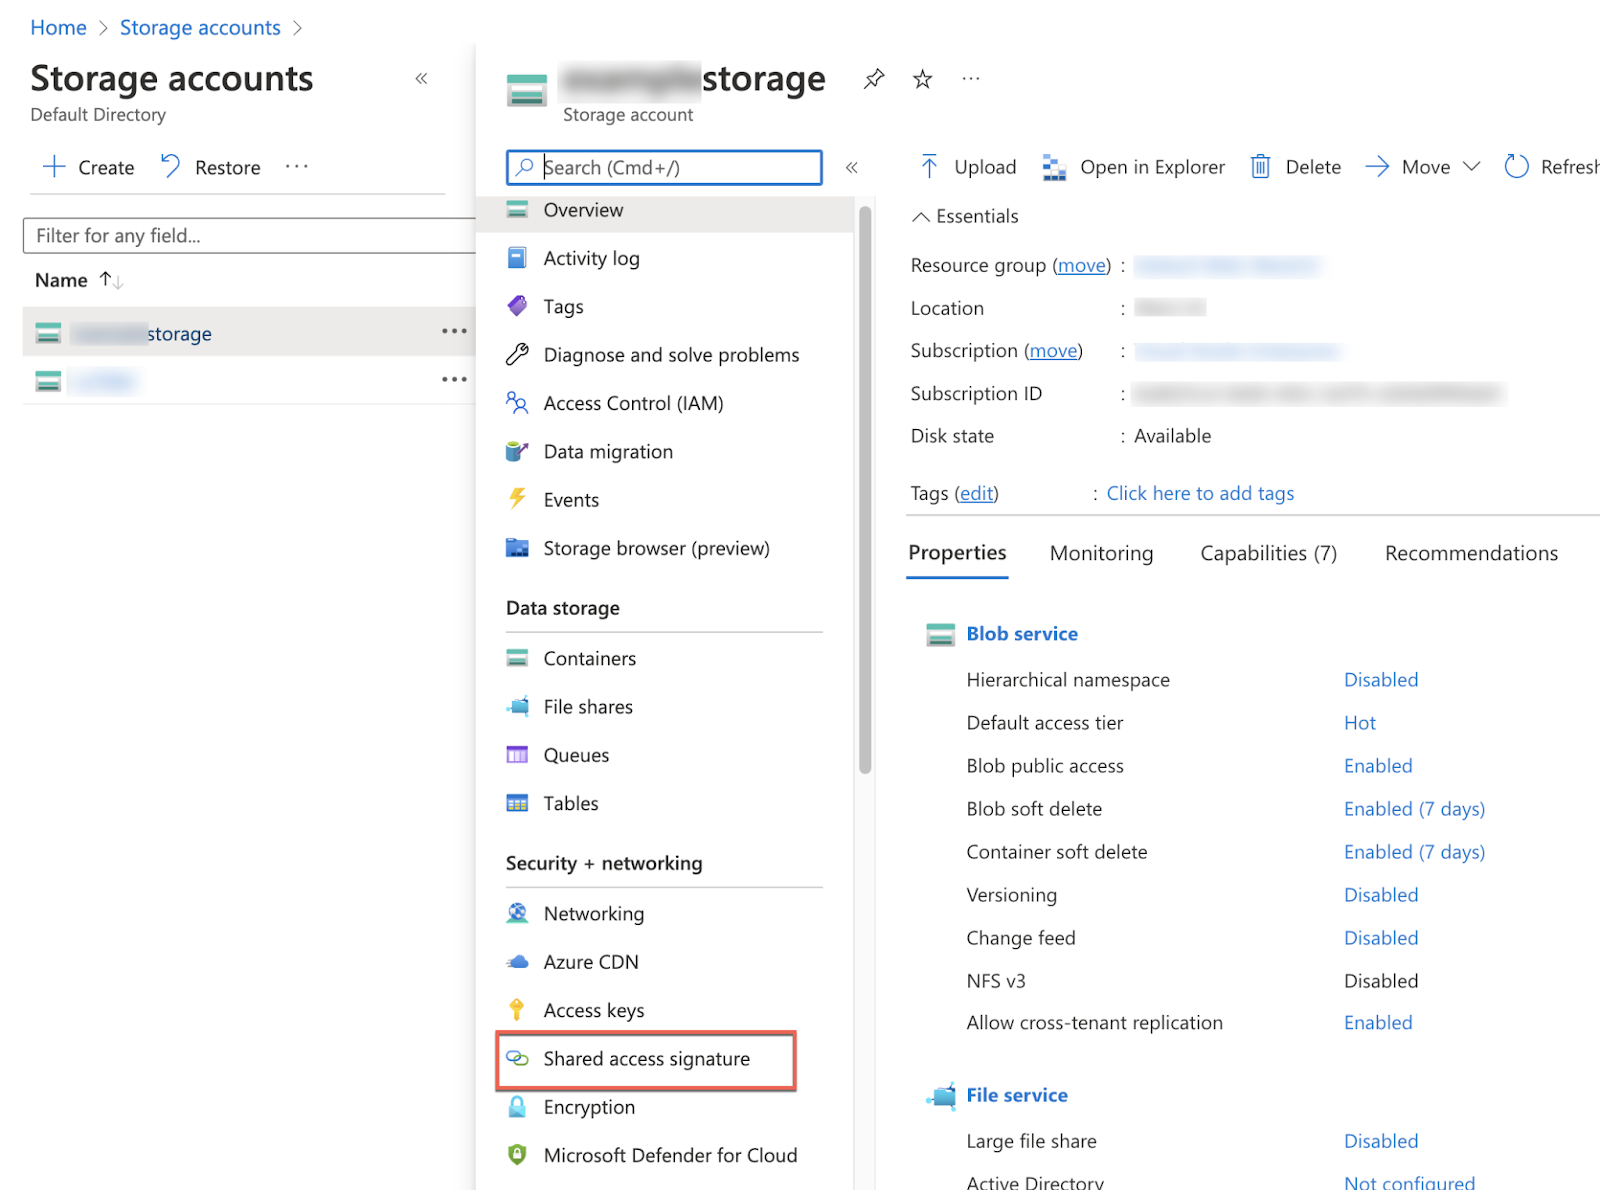
- The storage account page will open up. In the left navigation bar, select the Security + Networking tab and choose the Shared access signature option.
 Click the Shared access signature option.
- On the Shared access signature page, check the following boxes and specify the Start and expiry date/time. Finally, click the Generate SAS and connection string.
 Select these checkboxes in the Shared access signature page.
 Select these checkboxes in the Shared access signature page.
Step 2: Retrieve Your Container Name
- In the search bar of your Azure Blob Storage account, type storage account.
- Click on Storage accounts under the Services tab.
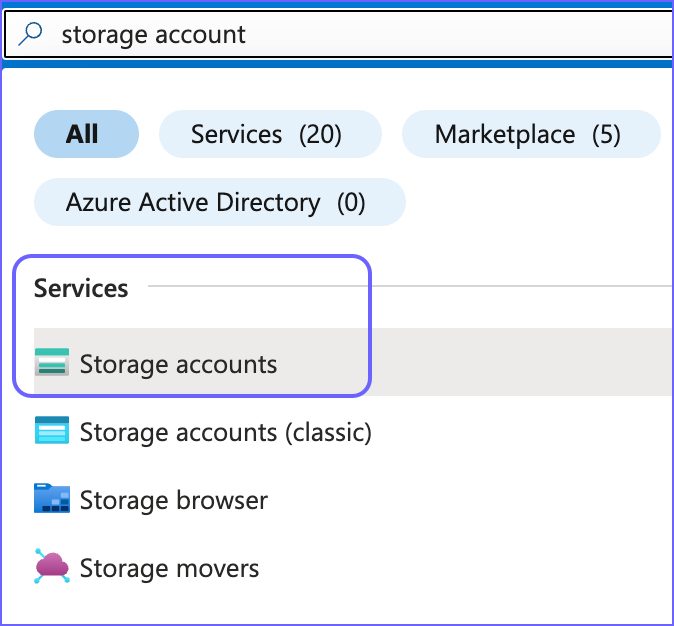
Finding the Storage accounts.
- The Storage accounts page will open up. Select your storage account name. In the following image, we have used hevodocstorage1 as an example.
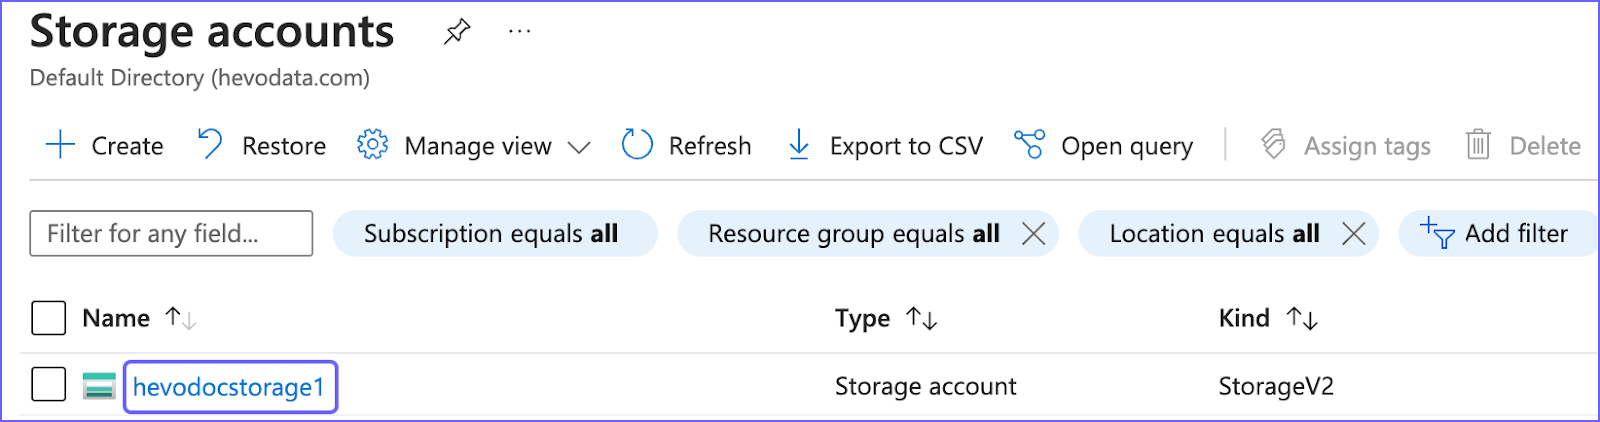
Selecting the right storage account.
- From the left navigation pane, select the Containers option under the Data Storage tab.
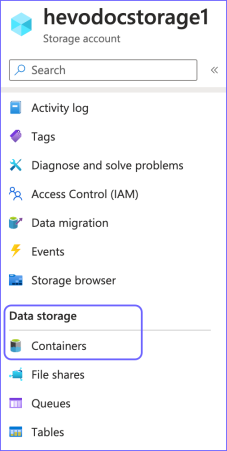
Finding the Containers tab.
- The Containers page will open up. Copy the connection string value. In the following image, we have used hevodocfs as an example.
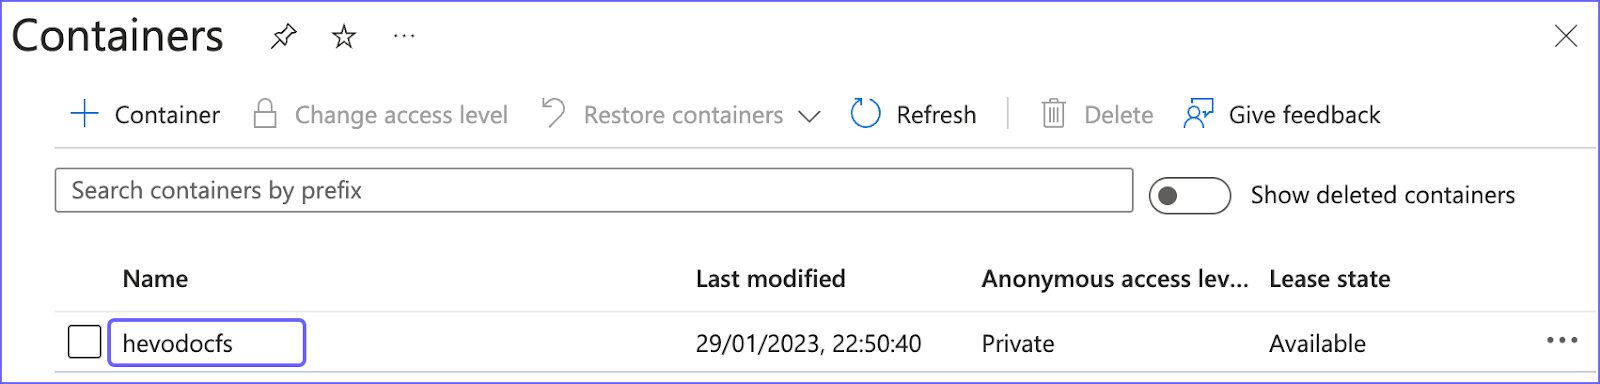
Configuring values in the Containers tab.
Step 3: Establish Azure Blob Storage as the Source
- In the Hevo dashboard, under the Navigation Bar, select the PIPELINES tab.
- In the Pipelines List View, select +CREATE.
- The Select Source Type page will open up. Choose the Azure Blob Storage option.
- Fill out all the mandatory fields on the Configure your Azure Blob Storage Source page.
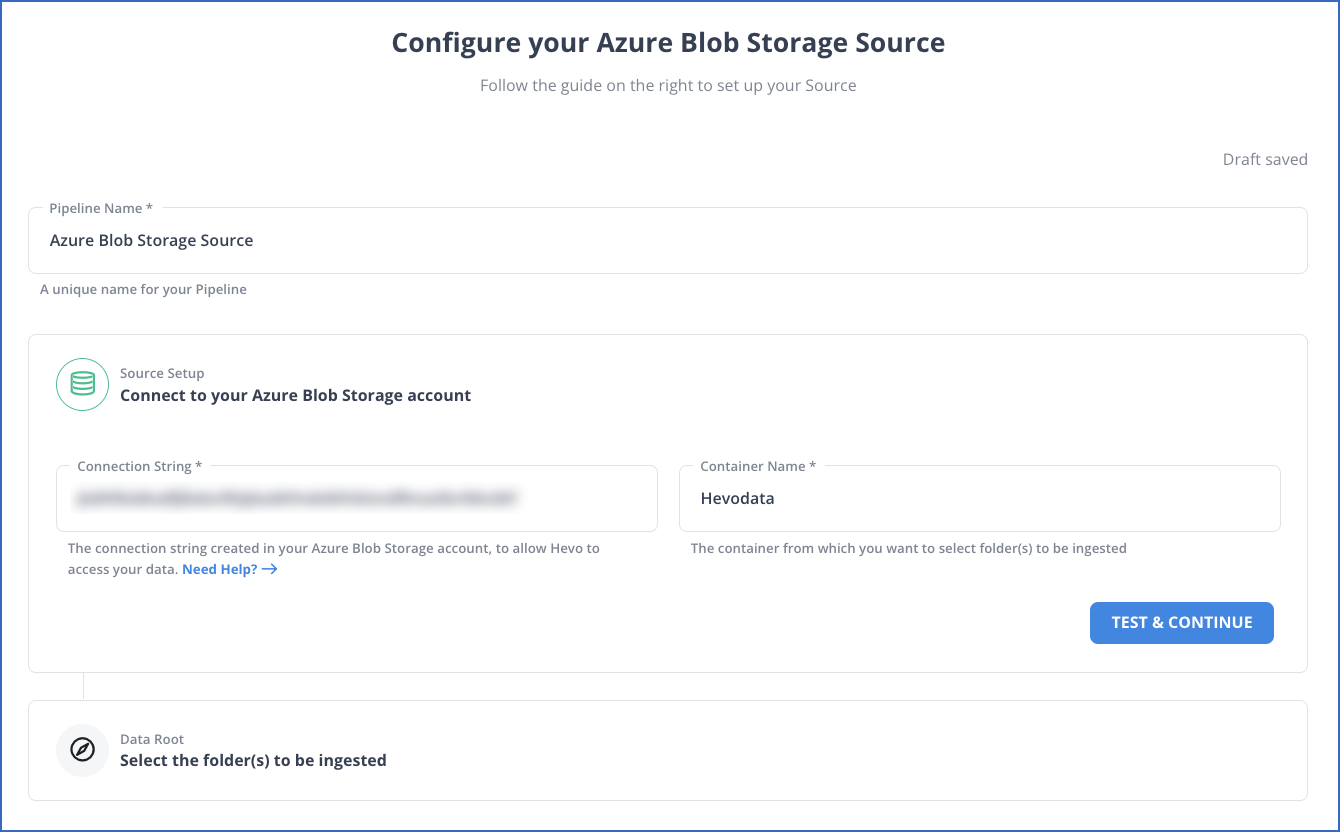
Configure your Azure Blob Storage Source page.
To learn more about configuring Azure Blob Storage as a source, head on to our documentation.
- Under the Data Root tab, select all the folders and specify the data format for the files you want to ingest into Hevo. Then, click on the CONFIGURE SOURCE button.

Data Root tab under the Configure Azure Blob Storage Source page.
It is important to note that you must specify some additional settings in Hevo for the file format you select. Check it out here.
Azure Blob to Snowflake Integration With Hevo: Setting up the Destination
Take a look at the detailed steps to set up an Azure Blob to Snowflake ETL data pipeline in Hevo.
Prerequisites for Setting Snowflake as the Destination of Your Pipeline
- An active Snowflake account and either ACCOUNTADMIN or SECURITYADMIN role in Snowflake. These roles are required to create a new role for Hevo.
- An ACCOUNTADMIN or SYSADMIN role in Snowflake if you want to create a warehouse.
- Assign Hevo USAGE permissions to the data warehouse and USAGE and CREATE SCHEMA permissions to databases.
- Ensure that you assign Hevo the following permissions for all current and future schemas: USAGE, MONITOR, CREATE TABLE, CREATE EXTERNAL TABLE, and MODIFY.
- You must be assigned to the Team Collaborator or any other administrator role in Hevo, except the Billing Administrator role.
Step 1: Configure Your Snowflake Warehouse
- Log in to your Snowflake account, and from the Worksheets tab, select the + icon.

Worksheet tab in your Snowflake account.
- In the new worksheet, paste the following script. Make sure you replace the sample values in lines 2-7 with your own values in uppercase to create your warehouse. These values are: role_name, user_name, warehouse_name, database_name and schemaName.
-- create variables for user / password / role / warehouse / database (needs to be uppercase for objects)
set role_name = 'HEVO'; -- Replace "HEVO" with your role name
set user_name = 'HARRY_POTTER'; -- Replace "HARRY_POTTER" with your username
set user_password = 'Gryffindor'; -- Replace "Gryffindor" with the user password
set warehouse_name = 'HOGWARTS'; -- Replace "HOGWARTS" with the name of your warehouse
set database_name = 'RON'; -- Replace "RON" with the name of your database
set schemaName = 'DARK_ARTS'; -- Replace "DARK_ARTS" with the database schema name

set db_schema = concat($database_name, '.', $schemaName);

begin;

-- change role to securityadmin for user / role steps
use role securityadmin;

-- create role for HEVO
create
role if not exists identifier($role_name);
grant role identifier($role_name) to role SYSADMIN;

-- create a user for HEVO
create user if not exists identifier($user_name)
password = $user_password
default_role = $role_name
default_warehouse = $warehouse_name;

-- Grant access to the user
grant role identifier($role_name) to user identifier($user_name);

-- change role to sysadmin for warehouse / database steps
use role sysadmin;

-- create a warehouse for HEVO, if it does not exist
create
warehouse if not exists identifier($warehouse_name)
warehouse_size = xsmall
warehouse_type = standard
auto_suspend = 60
auto_resume = true
initially_suspended = true;

-- create database for HEVO
create database if not exists identifier($database_name);

-- grant HEVO role access to warehouse
grant USAGE
on warehouse identifier($warehouse_name)
to role identifier($role_name);

-- grant HEVO access to current schemas
use role accountadmin;
grant CREATE SCHEMA, MONITOR, USAGE, MODIFY
on database identifier($database_name)
to role identifier($role_name);

-- grant Hevo access to future schemas
use role accountadmin;
grant SELECT on future tables in database identifier($database_name) to role identifier($role_name);
grant MONITOR, USAGE, MODIFY on future schemas in database identifier($database_name) to role identifier($role_name);

use role accountadmin;
CREATE SCHEMA IF not exists identifier($db_schema);
GRANT USAGE, MONITOR, CREATE TABLE, CREATE EXTERNAL TABLE, MODIFY ON SCHEMA identifier($db_schema) TO ROLE identifier($role_name);

commit;
After pasting the script, select it and run it to connect your Snowflake warehouse with Hevo.
Step 2: Get Your Snowflake URL
- Log in to your Snowflake instance and select the Admin tab.
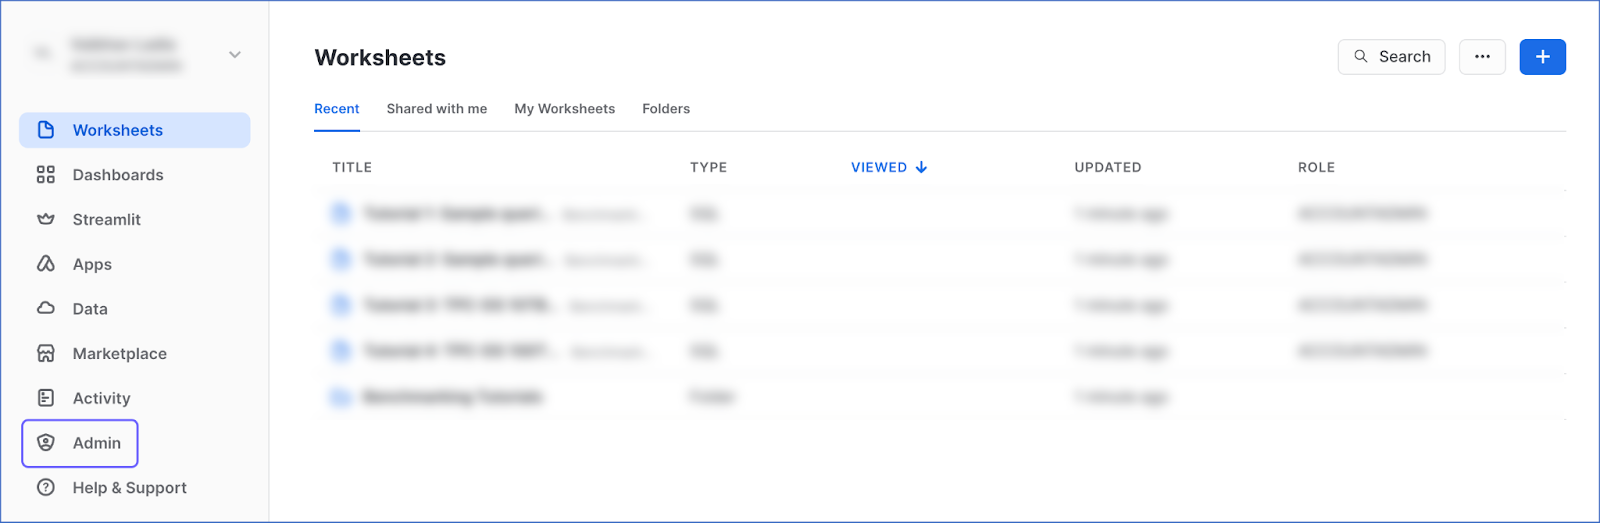
Admin tab in Snowflake Worksheets page.
- Click on the Accounts tab from the left pane.
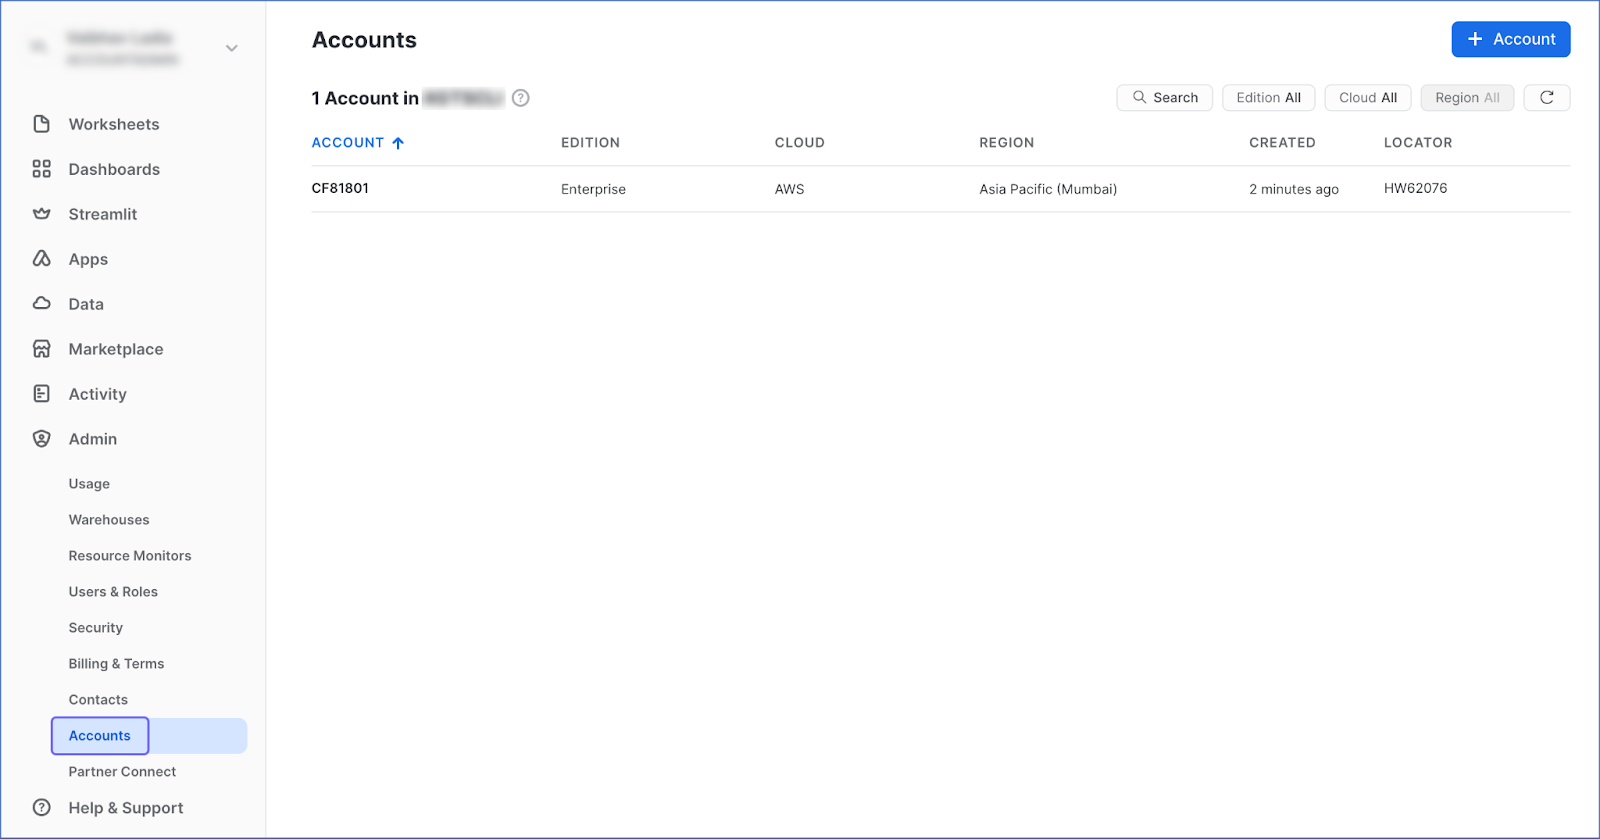
Accounts tab in Snowflake Admin page.
- Bring your cursor to the Locator field and copy the URL for your account using the link icon.
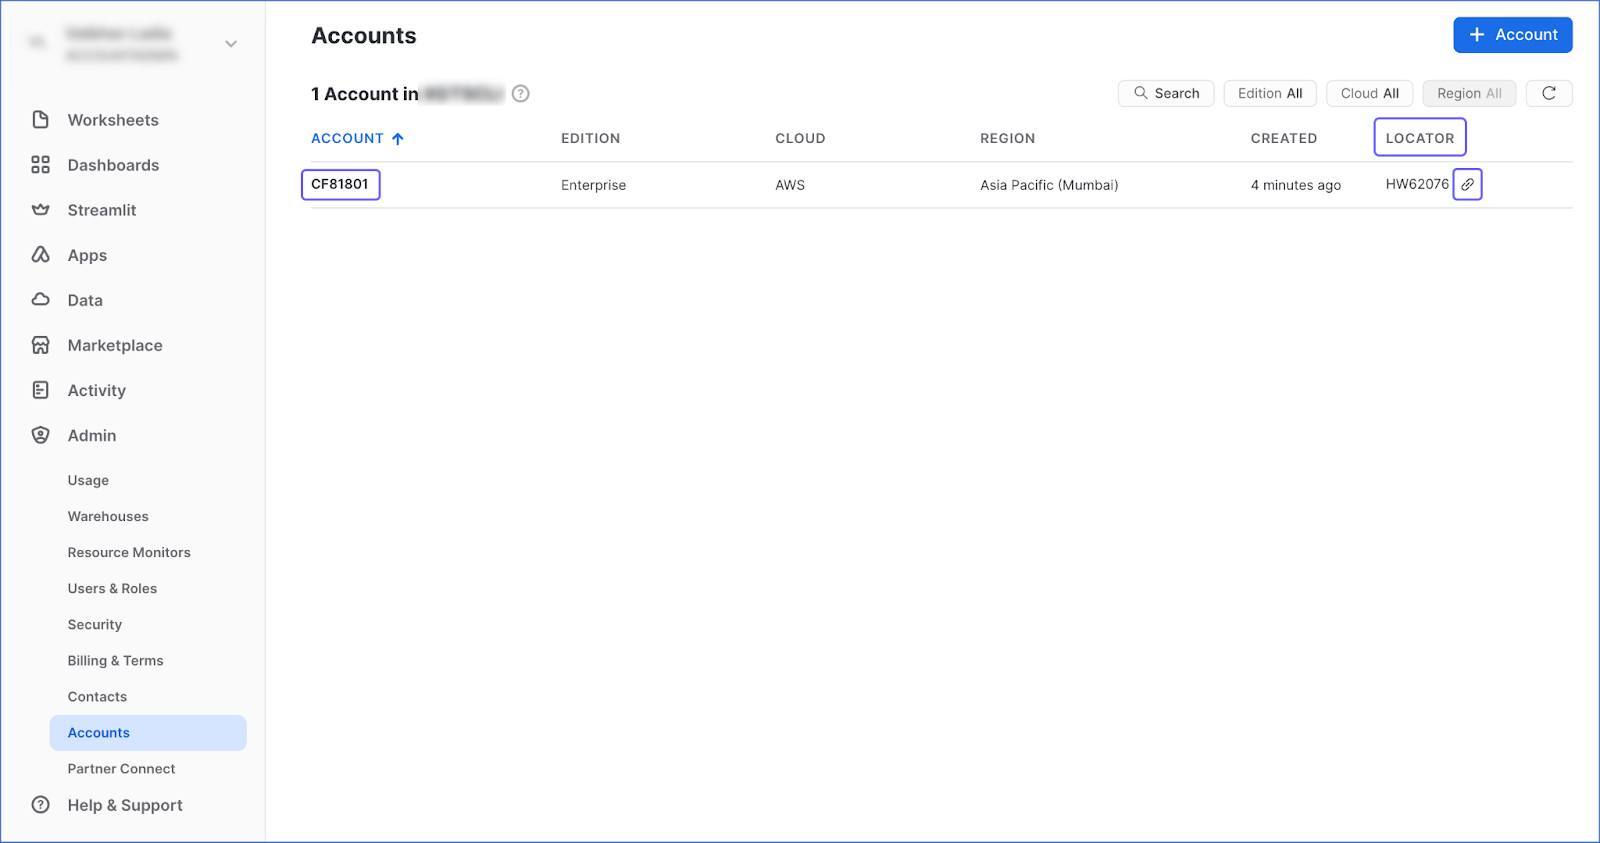
Copy the URL from the Snowflake Accounts page.
Step 3: Establish Snowflake as the Destination
- In the Hevo dashboard, under the Navigation Bar, select the DESTINATIONS tab.
- In the Destinations List View, select +CREATE.
- The Add Destination page will open up. Choose the Snowflake option.
- In the Configure your Snowflake Destination page, fill in all the mandatory fields.
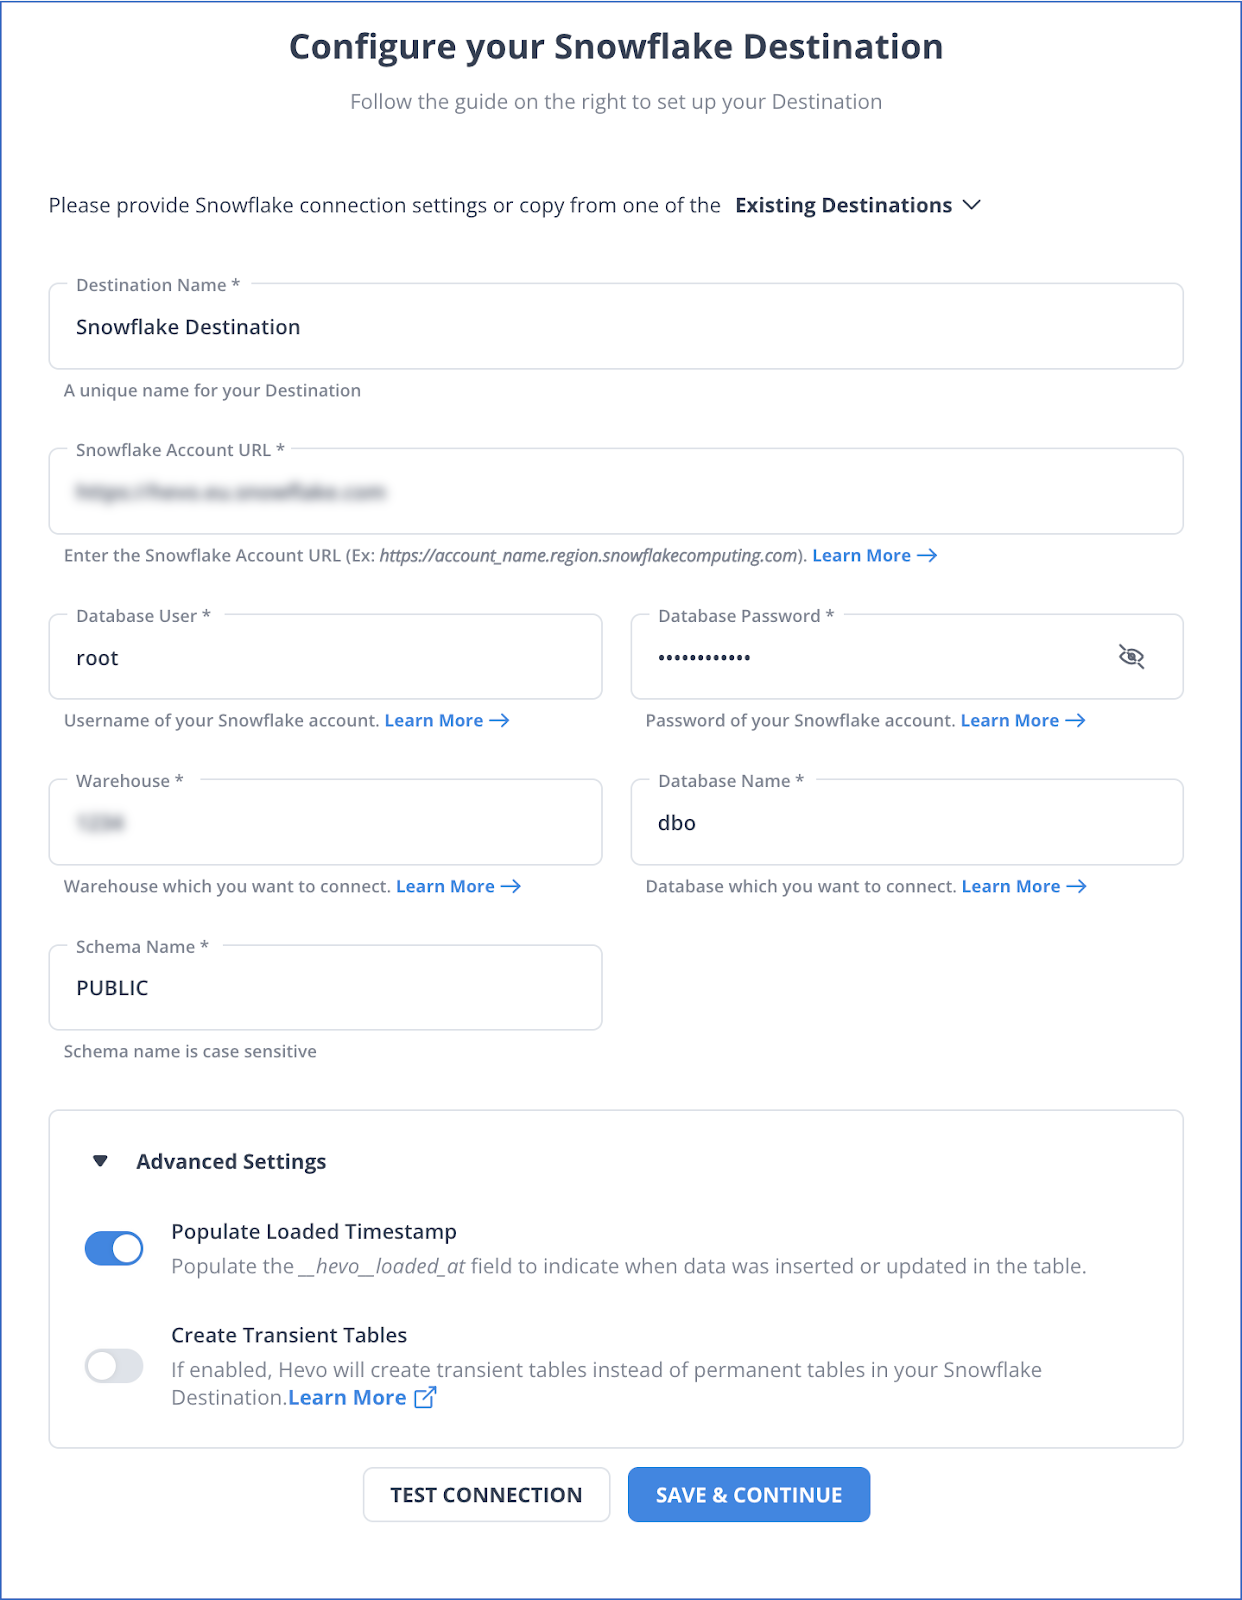
Configure your Snowflake Destination page.
To know more about configuring Snowflake, you can read the Hevo documentation.
- Enable both options under the Advanced Settings tab. Click on TEST CONNECTION > SAVE & CONTINUE.
With these simple steps, your Hevo data pipeline from Azure Blob Storage to Snowflake is all set!
Method 2: Copy Data from Azure Blob to Snowflake by Using a SAS Token
Snowflake supports data loading from Blob Storage and assumes the data files are staged in an Azure container. One way to configure an Azure container is by generating a SAS token.
Step 1: Generate the SAS Token in Azure Blob Storage
The SAS token grants Snowflake limited access to the objects in your Blob storage account. Once you log in to the Azure portal, here’s what you need to do:
- Go to the Storage Accounts tab from the home dashboard and select your <storage_account>.
- Under the Security + networking tab, choose the option, Shared access signature.
Azure Blob Storage to Snowflake: Choose the Shared access signature tab from your Azure storage account.
- Under the Allowed services tab, select Blob.
- Under the Allowed resource types section, select Container and Object.
- You must grant the Write, Add, Create, and Permanent Delete permissions to unload files into an Azure container. Additionally, use the PURGE = TRUE option.
- Add the start and expiry date/time for the SAS token.
- Under the Allowed protocols tab, select between HTTPS only or HTTPS and HTTP.
- Ensure you leave the Allowed IP addresses field blank.
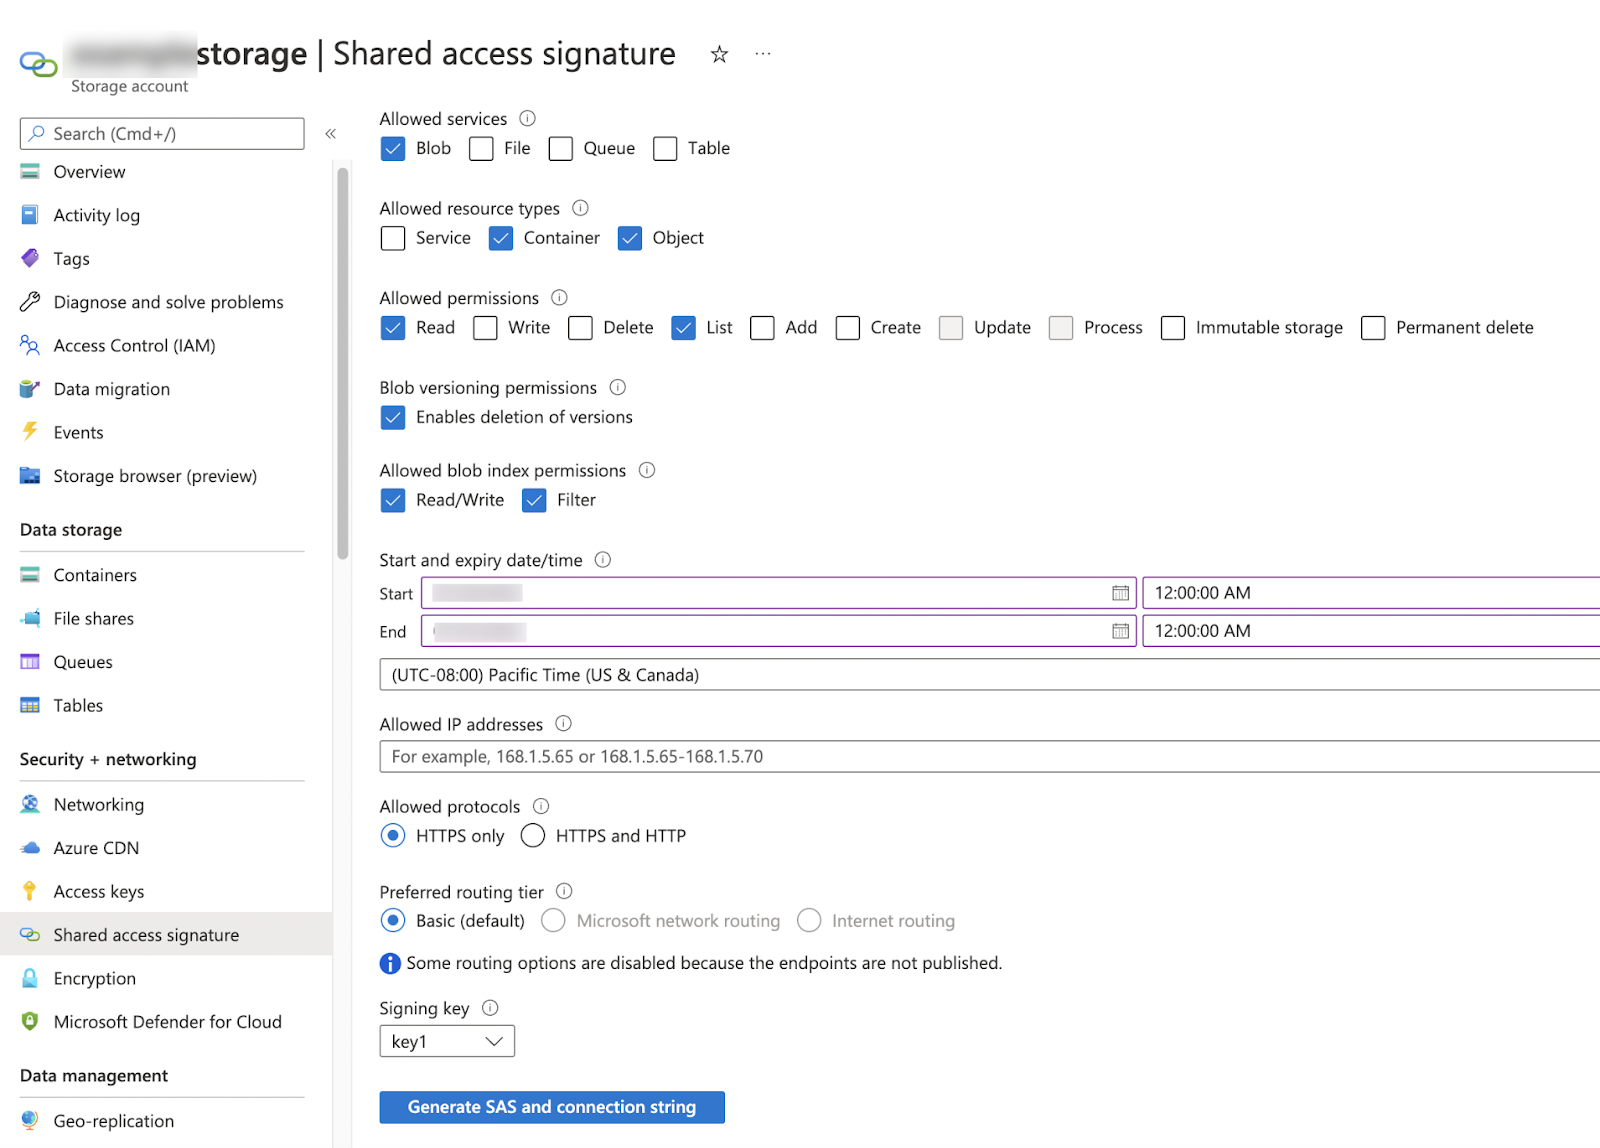
Azure Blob Storage to Snowflake: Fill in all the fields to create a container in Azure.
Step 2: Create an External Azure Stage
You can use SQL to create an external Azure stage that references your generated SAS token. Use the following code:
CREATE OR REPLACE STAGE my_azure_stage
  URL='azure://myaccount.blob.core.windows.net/mycontainer/load/files'
  CREDENTIALS=(AZURE_SAS_TOKEN='?sv=2016-05-31&ss=b&srt=sco&sp=rwdl&se=2018-06-27T10:05:50Z&st=2017-06-27T02:05:50Z&spr=https,http&sig=bgqQwoXwxzuD2GJfagRg7VOS8hzNr3QLT7rhS8OFRLQ%3D')
  ENCRYPTION=(TYPE='AZURE_CSE' MASTER_KEY = 'kPx...')
  FILE_FORMAT = my_csv_format;
Here, you must replace a few values. Give your external stage a unique name instead of my_azure_stage, and add your Azure credentials and master key encryption. The stage references the data files using the file format my_csv_format.
Step 3: Move the Data from Azure Blob Storage to Snowflake
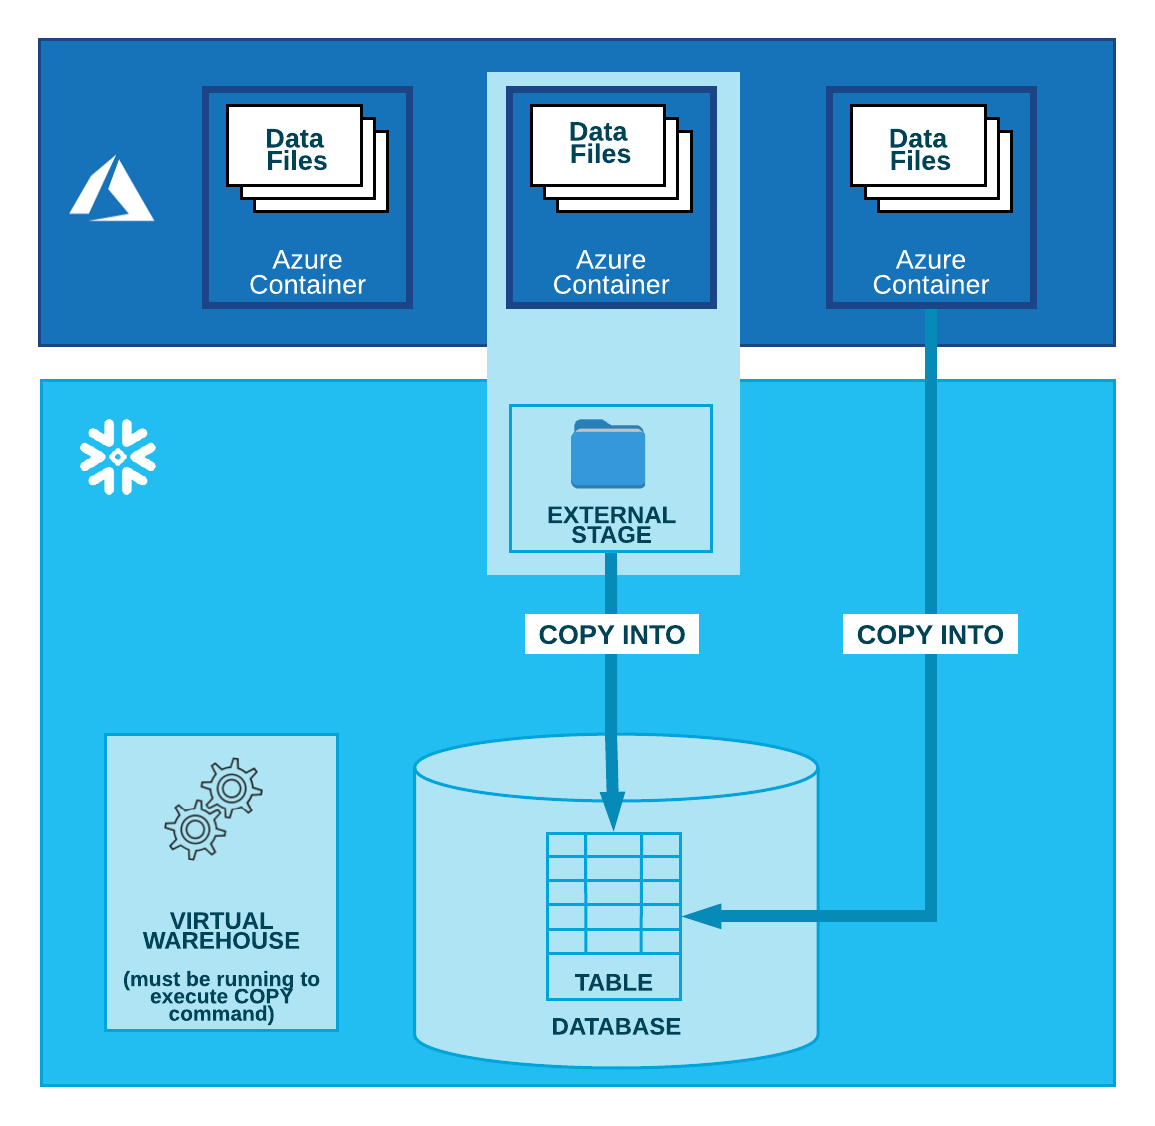
How data moves from Azure container into Snowflake table
Load the data file from your staged Azure container into an existing table in Snowflake. For this, you can use the COPY INTO <table> command.
COPY INTO [<namespace>.]<table_name>
     FROM { internalStage | externalStage | externalLocation }
[ FILES = ( '<file_name>' [ , '<file_name>' ] [ , ... ] ) ]
[ PATTERN = '<regex_pattern>' ]
[ FILE_FORMAT = ( { FORMAT_NAME = '[<namespace>.]<file_format_name>' |
                    TYPE = { CSV | JSON | AVRO | ORC | PARQUET | XML } [ formatTypeOptions ] } ) ]
[ copyOptions ]
[ VALIDATION_MODE = RETURN_<n>_ROWS | RETURN_ERRORS | RETURN_ALL_ERRORS ]
For the externalLocation, use your Microsoft Azure Blob Storage credentials that you generated earlier.
  'azure://<account>.blob.core.windows.net/<container>[/<path>]'
  [ { STORAGE_INTEGRATION = <integration_name> } | { CREDENTIALS = ( [ AZURE_SAS_TOKEN = '<string>' ] ) } ]
  [ ENCRYPTION = ( [ TYPE = { 'AZURE_CSE' | 'NONE' } ] [ MASTER_KEY = '<string>' ] ) ]
In just three steps, you can move data directly between Azure Blob Storage and Snowflake. However, this method requires you to be proficient in SQL code, which can be challenging if you are a beginner. Let’s look at some other limitations associated with this method.
Associated Limitations
- Government Region Access: To integrate datasets, you must ensure that the government region is the same for your Azure Blob Storage account and your Snowflake account hosted on Azure.
- Time-intensive: If you are configuring a Snowflake storage integration to migrate data, you must know Azure takes an hour or two to create the Snowflake service principal. This may cause a delay and disrupt operations during critical assignments.
Method 3: Move Data from Azure Blob to Snowflake by Configuring a Snowflake Storage Integration
A storage integration is an object in Snowflake that is used to store a generated service principal for your Azure cloud storage account. It can support multiple Azure stages. Before creating a cloud storage integration in Snowflake, you must have an ACCOUNTADMIN role or the global CREATE INTEGRATION privilege.
Step 1: Create a Single Storage Integration
Before executing the SQL command below, ensure that you give a name for your integration, provide your Office 365 ID in place of <tenant_id>, and the name of your Azure container, which contains your data files.
CREATE STORAGE INTEGRATION <integration_name>
  TYPE = EXTERNAL_STAGE
  STORAGE_PROVIDER = 'AZURE'
  ENABLED = TRUE
  AZURE_TENANT_ID = '<tenant_id>'
  STORAGE_ALLOWED_LOCATIONS = ('azure://<account>.blob.core.windows.net/<container>/<path>/', 'azure://<account>.blob.core.windows.net/<container>/<path>/')
  [ STORAGE_BLOCKED_LOCATIONS = ('azure://<account>.blob.core.windows.net/<container>/<path>/', 'azure://<account>.blob.core.windows.net/<container>/<path>/') ]
Step 2: Give Snowflake Access to Your Storage Location
- To retrieve the consent URL, execute the code below:
DESC STORAGE INTEGRATION <integration_name>;
Here, the <integration_name> is the same name you provided in the previous step.
- Once you obtain the URL, open a new browser window and paste the link. The Microsoft permissions request page will open up. Click on the Accept button.
- You will be directed to the Snowflake website. Log in to your Microsoft Azure portal.
- From the dashboard, navigate to the Storage Accounts section under the Azure Services tab.
- Click on the Access Control (IAM) option and select the Add role assignment option.
- You can choose between Storage Blob Data Reader, which grants read access to your Snowflake service principal, and Storage Blob Data Contributor, which grants both read and write access.
- Next, you must search for your Snowflake service principal identity in the AZURE_MULTI_TENANT_APP_NAME property.
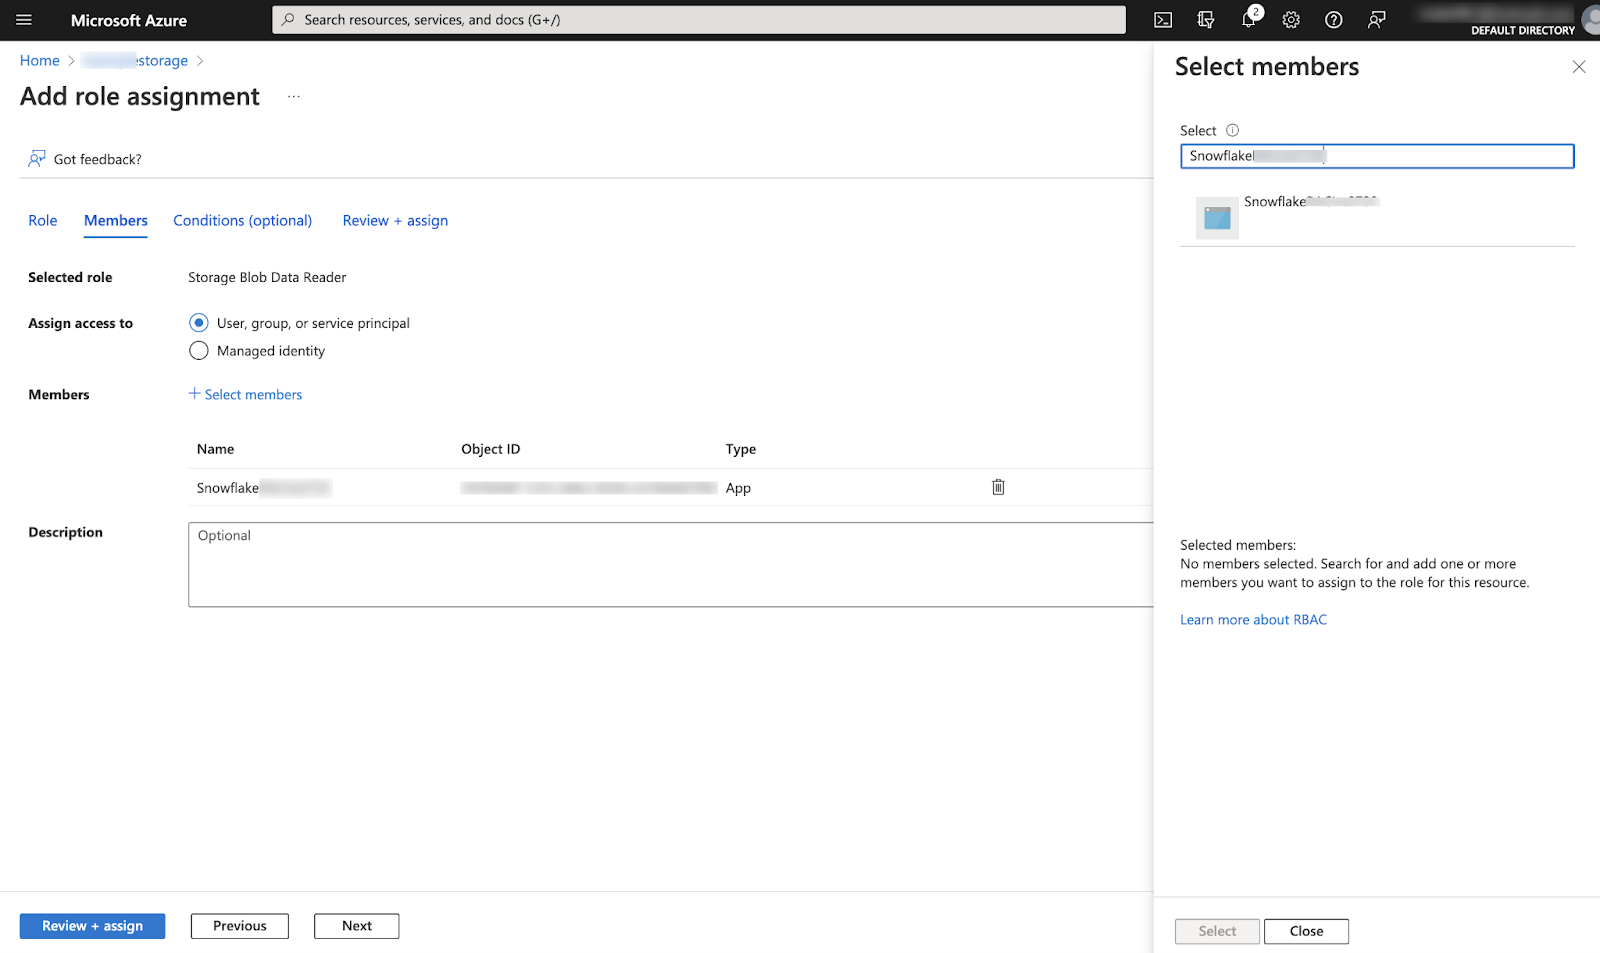
Azure Blob Storage to Snowflake: Add role assignment page
- Finally, select the Review + assign button.
Step 3: Create an External Stage to Migrate Data from Azure Blob Storage to Snowflake
You must have the USAGE privilege for your storage integration object to create an external stage. Use the command below:
USE SCHEMA mydb.public;

CREATE STAGE my_azure_stage
  STORAGE_INTEGRATION = azure_int
  URL = 'azure://myaccount.blob.core.windows.net/container1/path1'
  FILE_FORMAT = my_csv_format;
In the above example, mydb.public is the current database and schema, while the stage name is my_azure_stage. You can change these according to your credentials and also adjust the FILE_FORMAT for a smooth data migration process.
Use Cases Of Migrating Data from Azure Blob to Snowflake
- Azure Blob Storage helps you create data lakes for your analytical needs. However, Snowflake supports integrations with a wide range of data analytical tools to help you comprehensively analyze datasets.
- You should consider migrating data from Azure Blob Storage to Snowflake because Snowflake has no limitations for storing large volumes of data. This contrasts with Azure Blob Storage, as the maximum size limit for storing data in a single blob is 4 TB.
- Snowflake offers separate pricing for its storage and compute layers. Since the two layers are independent of each other, you get an economical solution for storing and processing large datasets.
Wrapping Up
Through this article, you have learned two easy methods to migrate data from Azure Blob Storage to Snowflake. The SAS Token method can be challenging for people who lack technical expertise. On the other hand, Hevo is more seamless and faster, providing you the flexibility to create several pipelines without requiring coding expertise. The platform supports integration with some of the leading data warehouses and storage applications. You can easily configure pipelines to copy data from Snowflake to Azure Blob or Amazon Redshift to BigQuery in just a few minutes!
Frequently Asked Questions (FAQs)
- What are the different ways to move data from Azure Blob Storage to Snowflake?
- There are two ways to load data from Azure Blob Storage to Snowflake. In the first method, you must create a storage integration and an external stage that leverages service principals and IAM access controls. The second method involves generating a SAS Token. Alternatively, you can use data pipeline platforms like Hevo, that enable you to build a direct pipeline between the two platforms.
- How to move files located in different Azure Blob Storage containers to Snowflake?
- Based on the STATUS available in Snowflake’s COPY HISTORY, you cannot move files in different Azure Blob Storage containers. You can turn to data pipeline platforms that support ETL or ELT processes, such as Hevo. With Hevo, you can collect data from multiple sources and load them into your created pipeline between Azure Blob Storage and Snowflake.
- Can I copy the whole database while I unload data from Snowflake to Azure Blob?
- You can only unload data from a table into an Azure container, not the entire database. However, if you want to move data from different containers, you can consider setting up a data pipeline from Snowflake to Azure Blob Storage with Hevo.
Riya is a technical content writer who enjoys writing informative blogs and insightful guides on data engineering.
An avid reader, she is committed to staying abreast of the latest developments in the data analytics domain.