Data is a prominent tool for organizations to analyze business operations. Collecting and mapping data is necessary for better understanding and analyzing applied procedural outcomes. To make your data more accessible and secure, you must migrate it from one database storage to another.
JSON to MySQL is an example of such a migration. MySQL is a well-suited choice for filtering and improving the readability of data present in JSON documents. This article will provide three methods to migrate your data from JSON to MySQL.
Overview of JSON
JavaScript Object Notation (JSON) is a text-based formatting language for data storage and transportation. Although its syntax is based on JavaScript Objects, you can still use it as an independent language.
JSON differs from other text-format languages because it is easy to understand and read. Because of its language independence, it can easily handle structured, unstructured, and complex data.
It is a text-based formatting language that uses key-value pairs. The key contains a string data type, and the value includes data types such as numbers, strings, booleans, arrays, etc. This feature makes JSON a more efficient language for web browsers and servers to transmit data quickly across various platforms and web applications.
Overview of MySQL
MySQL is a relational database that stores structured data for various operational purposes. It contains structured data sets in rows, columns, and tables, enabling efficient work on complex data and increasing the database’s usability.
This database management system supports different programming languages, making it a great choice for developers. You can also set up rules and guidelines such as one-one, one-many, optional, required, or pointers enforced on the database application. This feature enhances data optimization by removing duplicates and inconsistencies, such as outdated or missing data.
Methods to Load Data from JSON to MySQL
Let’s look at some methods that will help you load your data from JSON to MySQL.
Method 1: Migrating Data from JSON to MySQL Using Hevo
Hevo Data is the only real-time ELT platform that performs data integration without any coding. It has simplified the data transmission process from source to destination through automated pipelines, helping it adapt to the flexible needs of the user.
Hevo supports 150+ sources, helping you export data to destinations such as databases, cloud platforms, analytics platforms, etc. Thus, it is compatible with different data-driven systems, making it a fitting choice for modern-day applications and devices.
Benefits of Using Hevo
- Incremental Data Load: Hevo allows real-time transfer of modified data from the source to the destination. If you make modifications to the data at the source, Hevo will automatically replicate those changes to the destination dataset.
- Data Transformation: Hevo provides powerful Python-based and drag-and-drop transformations to fine-tune the datasets before loading them into the data warehouse.
- Supports Complex Data Structures: Hevo supports complex data structures such as nested JSON, hierarchical data, arrays, and mixed data structures inside JSON format. It seamlessly integrates the data to the destination in a structured form.
- Automated Schema Mapping: Hevo automatically identifies the incoming schema and replicates it into your destination without any manual work. Adapting schema mapping while transforming data from JSON to MySQL reduces errors and speeds up conversion.
- Data Security: Hevo has implemented sturdy data governance measures, ensuring the data transformation process is compliant and secure. These measures help with MySQL’s data, providing only the right people have access controls.
Get Started with Hevo for Free
Steps to Create a Data Pipeline in Hevo to Load Data from JSON to MySQL
Let’s delve into the steps to move data from JSON to MySQL.
1. Set JSON as Your Source
Before you insert JSON to MySQL, you must know that Hevo parses the nested JSON field, column, and array so the data is easily readable.
Prerequisites
- Before setting JSON as the source type, you must understand JSON, JSONPATH, and JSONPATH expressions.
- An understanding of REST API.
A. Select REST API as Your Source Type
Through Hevo, you can bring in data from various sources using the REST API connector. It specifies a path for a JSON document, assisting you to load JSON to MySQL without any hindrance.
 JSON to MySQL: Set REST API as Your Source
Prerequisites
- You need to have a generic understanding of JSONPATH and JSONPATH expressions.
- The file’s location from where your data can be extracted or the REST API endpoint should be available.
- You must be a Team Administrator, Team Collaborator, or Pipeline Administrator to create a pipeline in Hevo.
When registering on the application, you must replace the placeholder name with your Hevo region.
B. Configure REST API for Your Source
To configure REST API as your source, follow the steps below:
- Select PIPELINES from the Navigation Bar.
- Click on +CREATE in the Pipeline View List.
- Select REST API from the Select Source Type page.
- Provide all the relevant details in the Configure your REST API Source page.
 JSON to MySQL: Configure your REST API Source
- Define a name for your pipeline, at most 255 characters.
- Set up your REST API source.
- Specify the data path or root from which your data must be replicated.
- Select the Pagination Method to read the API response. The default setting is No Pagination.
- Click on the Finish Setup option.
 JSON to MySQL: Set Up Pagination
C. Construct a Connection for your REST API source endpoint
 JSON to MySQL: Specifying Details for the REST API Source
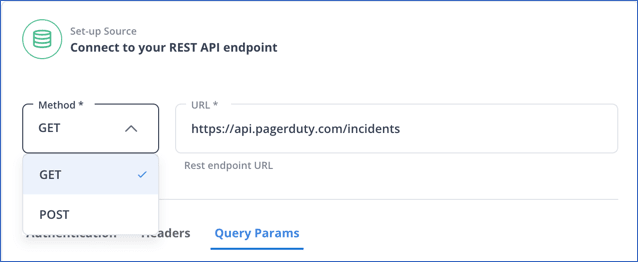
- Select a Method:
- Get: An HTTP method requests data from the API Source.
- Post: It is an HTTP method for sending the data to the API Source.
If you select the POST method, you must choose a Request Body containing the data sent to your API endpoint. The data must be in a valid JSON or Form Data format. In the image below, the data is in valid JSON format, creating a PageDutyIncident.
 JSON to MySQL: Connecting to Rest API Endpoint
D. Setting up a Data Replication Path
You need to direct Hevo to the element in the API source from where the data has to be extracted. For this, you need to specify the root of the data and check its validity.
 JSON to MySQL: Insert Data Root
The image above shows that the data root selects the first suggested root and its parsed response in the Sample Response from API for JSON to MySQL converter. Hevo selects the origins based on the reactions in the URL connection. You can choose the suggested root or enter your data root. If you provide your own data root, you must check the validity of the data.
Pagination allows you to read the data from the API source in small sections and synchronize it.
 JSON to MySQL: Pagination Methods
To determine the expected result, you must check the API response for a particular pagination method. Then, go through the Hevo, set up pagination, and learn how to do so.
2. Set MySQL as Your Destination
MySQL database has customizable software that helps store, manage, and process data securely, making it reliable for various data types. Hevo enables you to insert JSON into MySQL through its data pipeline. While creating a data pipeline, you can choose MySQL as your destination.
The JSON to MySQL query cannot run directly because the data coming to MySQL is first stored in the S3 bucket before it’s batched and transmitted to the database.
Prerequisites
- The MySQL server should be active before creating the pipeline. To check this, use the following command – service mysql status.
- You must be using a 5.5 or higher version of MySQL.
- You must be a Team Administrator, Team Collaborator, or Pipeline Administrator to create a pipeline in Hevo.
Step 1: Whitelist Hevo’s IP Addresses
To connect Hevo to your database, you must allow your region’s Hevo IP addresses to be in the MySQL configuration file.
- Navigate to the MySQL configuration directory. For example: /etc/mysql/mysql.conf.d
- Open the MySQL server configuration file in the editing mode.
For example: sudo nano/etc/mysql/mysql.conf.d/mysql.cnf
- Search through the [mysqld] section to update the bind-address variable in the following way:
- To allow an IPv4 address to your MySQL destination, use bind-address = 0.0.0.0
- Allow the Hevo IP address to connect to your MySQL destination:
For example: < Hevo_IP_address_of_your_region> – 10.2.7.152, update in bind address – bind address = 10.2.7.152
- Save your file and restart the MySQL server so that the changes can occur.
Step 2. Creating the Database User and Granting Privileges
- Creating Database User
Log in to your MySQL database using root user, using the SQL client tool, and enter the following command-
CREATE USER ‘<user_name>’@’%’ IDENTIFIED BY ‘<strong password>’;
- Grant Privileges to the User
- Log in to your MySQL database using the root user. For example – mysql -u root -p
- Insert the following command to grant privileges to the user-
GRANT ALTER, CREATE, CREATE TEMPORARY TABLES, DELETE, DROP, INSERT, SELECT, UPDATE ON <database_name>.* to <user_name>@<IP address> IDENTIFIED BY <user_password>;
Step 3. Configure MySQL Connection
- Select the DESTINATIONS option from the Navigation Bar.
- Click on +CREATE in the Destination List View.
- Select MySQL on the Destination Page.
 JSON to MySQL: Configure your MySQL Destination page in Hevo.
- Specify the following fields shown in the above image:
- Destination Name: Create a name for your destination not exceeding more than 255 characteristics
- Database Host: Specify the host’s MySQL IP address.
- Database Port: This is where the MySQL server looks for connections.
- Database User: Enter the username you created. This username should not have an administrative role in the database.
- Database Password: Insert the password created for the database user.
- Database Name: specify the destination name where you want to load the data.
- Additional Settings
- Connecting through SSH: By enabling this option, Hevo connects to your MySQL server through an SSH tunnel, providing an extra layer of security to the database.
- Using SSL: To enable an SSL encrypted connection, you need three things: a CA File containing the SSL certificate authority, a Client Certification file, which is a public key certificate file, and a Client Key file, which is a private key file.
- Click on Test Connection to check if all the mandatory fields are specified.
- Click on Save and Continue.
SIGN UP HERE FOR A 14-DAY FREE TRIAL
Learn more about how to load data from file to table in MySQL.
Method 2: Importing JSON to MySQL Using MySQL Shell
Earlier, if you wanted to upload data that was present in a JSON document to MySQL, you had to implement scripts for parsing JSON documents and use third-party platforms for data extraction. However, with the MySQL Shell feature, importing data from JSON documents into MySQL using a single operation has become easy.
- Using Command Line
In the code below, you can export JSON documents from “zips.json” in a test schema within the “zips” collection. In this example, the file with no extension was used as the target name by default, but you can generate a different name as you like.
mysqlsh root@localhost:33300/test –import /path_to_file/zips.json
Creating a session to ‘root@localhost:33300/test’
Please provide the password for ‘root@localhost:33300’:
Fetching schema names for autocompletion… Press ^C to stop.
Your MySQL connection id is 21 (X protocol)
Server version: 8.0.13 MySQL Community Server – GPL
Default schema `test` accessible through db.
Importing from file “/path_to_file/zips.json” to collection `test`.`zips` in MySQL Server at localhost:33300
.. 29353.. 29353
Processed 3.15 MB in 29353 documents in 1.2058 sec (24.34K documents/s)
Total successfully imported documents 29353 (24.34K documents/s)
- Using MySQL Shell Functions to Import JSON to MySQL
You can also use API to import JSON to MySQL, which is available in two modes: JavaScript util.importJson() and Python util.import_json()
The MySQL Shell helps create a pipeline for importing JSON to MySQL. First, you can import data in our custom scripts using JavaScript or Python. Then, use MySQL shell to execute the generated script.
Command:
\h importJson
 JSON to MySQL: Import JSON document into MySQL Using MySQL Shell
You can export JSON documents using the MySQL Shell function in the above example. However, you must still specify a path for the JSON document file to import and select the target schema, collection, or column.
 JSON to MySQL: Defining Path for JSON Documents
Commands used –
> util.importJson("/path_to_file/zips.json", {schema: "test", collection: "zips_collection"});

> util.importJson("/path_to_file/zips.json", {schema: "test", table: "zips_table"});
First, the file zips.json gets imported into a collection named “zips_collection,” which then moves into a table called zips_table, Here, you must use the JavaScript function util.import.Json(). Please note that the name for the collection and table was given by default as they did not exist.
It is important to remember that the collection only specifies valid (or non-existing) data or will show an error. If you want to import data into an existing table, use the ‘table’ option. If you don’t specify the column in the ‘tablecolumn’ option, then the ‘doc’ column is assumed to be the target by default.
Limitations of the Custom Method 2
- The MySQL Shell feature is not fully compatible with the older versions of MySQL.
- MySQL Shell consists of complex queries that can only be understood and performed by professionals well-versed in SQL code.
Method 3: Insert JSON Data into MySQL Table Using Python
You insert JSON data from a file called data.json into a MySQL Table. Take a look at the prerequisites for this method:
Prerequisites
- You should have MySQL.connector.
- You should have MySQL installed.
- You must have the latest version of Python on your system.
Once you fulfill the requirements, follow the steps below:
Step1: Create a Table in MySQL Database
You can create a table using a programming language or directly make a table in your database.
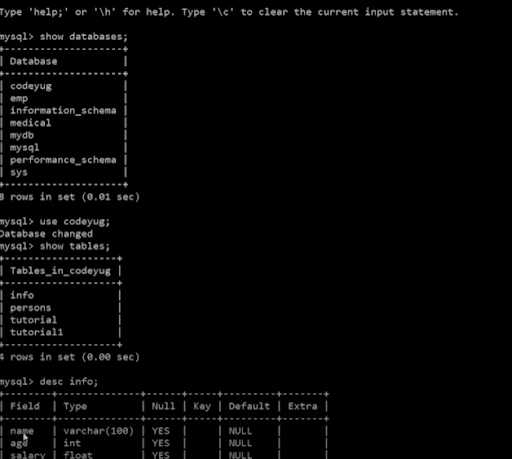 JSON to MySQL: Choosing ‘info’ Table to Insert JSON data
The above example has created a table in the MySQL database. Both the data.json and example.py are present in the same directory.
Step 2: Read the Contents of the JSON file and Store in it Variable ‘f’
- First, you will import the JSON file using – import_json.
- Second, you should import the connector using import mysql.connector
- You first use the ‘with’ statement to open the file in the directory, stored in the variable ‘f using’ – with open(‘data.json’, ‘r’) as f:
- To read the data from the file stored in variable ‘f,’ you can use the load function- json.load (f). This function will return the data from the data.json file and store it in the variable data.
 JSON to MySQL: Read and load data from JSON document
- You can check the data present in the variable by printing it using the print function – print(data). Check the output below-
 JSON to MySQL: Checking JSON data through ‘data’ Variable
Step 3: Insert Data from JSON to MySQL Table
- First, you have to connect MySQL and the Codeyug database.
- You have to write code inside the ‘try’ block.
- ‘connect’ is a method used to make a connection with MySQL.
- You must insert the correct credentials—user, password, host, port (by default, 3306, but you have to insert the port you have set), and the database name (to which you want to connect)
- In the second step, you can check whether the connection is made using the ‘if’ function.
- If your connection is successful, it will print ‘connected.’ Otherwise, it will show ‘cannot connect!’
 JSON to MySQL: Connecting to MySQL and Database
Step 4: Write Data in MySQL Table
- First, you have to create an object named cursor. To create a cursor object, make sure to use the object connection from earlier, ‘con’ – cur = con.cursor()
- Now, you can call the SQL query using the cursor object.
- You can visit each record one by one.
- To visit a record, you need to iterate through the data set.
- You should use the ‘for’ loop for data iteration.
for item in data:
print (item)
 JSON to MySQL: Printing a single record separately
- Insert data in the SQL Table:
- You must insert values in a table named ‘info.’
- Provide the names of the columns and values (using %s to insert a different value each time).
JSON to MySQL: Inserting Data in Table
- Execute the SQL query:
- First, you must get the data from the dictionary ‘item’ for each column separately using a variable called ‘val’.
- You need to create a tuple for the ‘val’ variable to call the values from the item.
- Execute the query using the cursor object from earlier and store the value in the variable ‘val’ for each record.
- You can also check the number of records printed using the rowcount() function.
- Finally, to have the data returned, close both the cur object and the connection object.
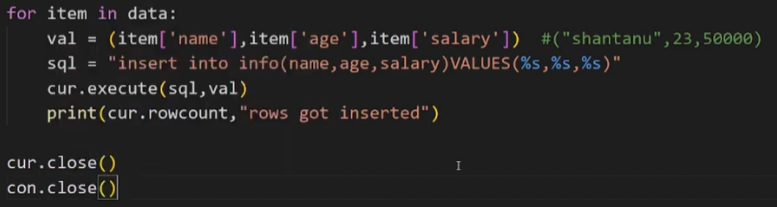 JSON to MySQL: Executing the Query
- Run the MySQL query using the commit() function:
- After executing the query, you must use the commit function to insert the data into the table.
 JSON to MySQL: Using Commit() for Inserting the data
- Check the results.
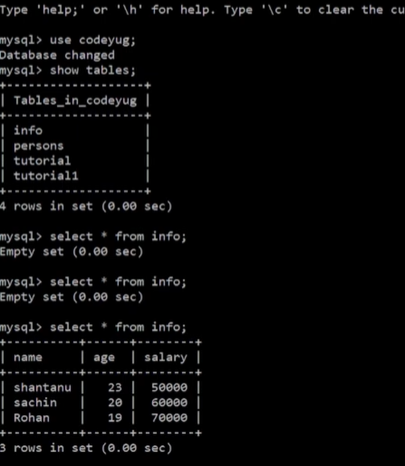 JSON to MySQL: Data Insertion In the MySQL Table
Limitations of the Custom Method 3
- Only individuals familiar with MySQL, databases, and programming languages like Python can use this method to convert JSON to MySQL.
Use Cases for Migrating Data from JSON to MySQL
- MySQL contains structured data sets in rows, columns, and tables, enabling efficient work on complex data. It increases your database’s usability.
- You can also set up rules and guidelines in MySQL per your requirements, such as one-one, one-many, optional, required, or enforce pointers on database applications. This feature ensures maintaining credibility and lessens data duplication.
- JSON columns accept only validated information. So, when you pass a JSON to a MySQL query, you don’t have to perform manual validation.
- The data stored in the JSON column in a MySQL database gets converted into binary rather than plain text format. This feature makes the data easily accessible when dealing with arrays or objects.
Wrapping Up
Ingesting data from a JSON document to MySQL helps you process the data in a structured manner and maintain data consistency. If you lack the technical expertise to write code and create custom pipelines, you can always turn to automated, no-code data pipeline platforms like Hevo.
Visit our Website to Explore Hevo
Hevo can help you integrate your data from numerous sources and load them into a destination to analyze real-time data with a BI tool such as Tableau. It helps transfer data from source to a destination of your choice for free. It will make your life easier and data migration hassle-free. It is user-friendly, reliable, and secure. Check out the Hevo Pricing details here.
Sign Up for a 14-day free trial with Hevo to start moving data from JSON to MySQL right now!
Frequently Asked Questions (FAQs)
Q. How can I convert my JSON data to MySQL?
There are different ways to convert your JSON data into MySQL. You can use Hevo, a zero-code data integration platform, which helps you move data from the source to the destination through a quick and cost-effective data pipeline.
Parsing JSON data using programming languages like Python can also convert JSON to MySQL. Alternatively, you can use MySQL’s new Shell feature to insert JSON documents into the MySQL database.
Q. What are the advantages of storing JSON data in MySQL?
With MySQL, you can store the data of a JSON file or document in a more structured form, allowing you to work more efficiently with data.
Saloni is a technical content writer, who enjoys writing articles about ML, AI and cloud-based storage platforms. She has experience writing about data integration, and different modern technologies related to this.