In today’s digital era, businesses continually look for ways to manage their data assets. Azure Database for MySQL is a robust storage solution that manages relational data. However, as your business grows and data becomes more complex, managing and analyzing it becomes more challenging. This is where Snowflake comes in. Snowflake enables you to analyze complex data from multiple sources, giving you a complete view of your business operations. Migrating data from Azure MySQL to Snowflake is a strategic move to generate data-driven insights and make informed decisions for your business.
This article is a comprehensive guide on how to connect and load data from Azure MySQL to Snowflake using different methods.
Let’s get started after a quick overview of Azure MySQL and Snowflake.
Why Integrate Data from Azure MySQL to Snowflake?
Integrating data from Azure MySQL to Snowflake helps you optimize your data processing and analysis. Here are two important reasons to move your data from Azure MySQL to Snowflake:
- Multi-Cluster Architecture: Snowflake is designed to meet your storage, processing, and analytics needs. Its multi-cluster architecture processes every query independently by its virtual cluster, ensuring it runs without impacting other users’ performance.
- Support Complex Analysis: You can perform complex analytics tasks, such as predictive modeling, machine learning, statistical analysis, and more, to optimize your processes, resources, and decisions.
Overall, the integration enables you to work efficiently on your data even in high concurrent environments.
Overview of Azure MySQL
Azure Database for MySQL is a fully managed relational database that is easy to set up and scale. It provides automated maintenance of your MySQL database server, including routine updates, backups, and security checkups. Azure MySQL supports SQL-based querying, making it suitable for various applications. Also, it has a pay-as-you-go model, where you only pay for resources you use, making it cost-effective for all users and businesses.
Overview of Snowflake
Snowflake is a fully managed SaaS data warehousing, analysis, and sharing platform. It allows you to create databases within data warehouses and can be hosted on different platforms, such as Microsoft Azure, AWS, and Google Cloud Platform. Its unique architecture separates storage and computing layers, allowing you to pay for the services you actively use. Thus, Snowflake provides data scalability, making it a sound choice among modern-day businesses.
Methods to Migrate Data from Azure MySQL to Snowflake
There are two ways to migrate Azure MySQL to Snowflake smoothly:
Method 1: Migrating Data from Azure MySQL to Snowflake Using Hevo
Hevo is a real-time ELT data integration platform that smoothly helps you sync Azure MySQL to Snowflake with its automated no-code data pipelines. It is flexible according to your workload and easy to set up. Hevo provides 150+ data sources to export and integrate data with your target system. It provides a thorough solution to enhance your data integration workflows and enrich your data through transformation.
Benefits of Using Hevo for Data Integration
- Data Transformation: You can cleanse, enrich, and transform your data before loading it into your desired destination through Hevo’s built-in data transformation capabilities.
- Incremental Data Loading: Hevo enables you to capture and load the updates and modifications in your source data to the targeted system in near real-time.
- Automated Schema Mapping: Hevo simplifies mapping by automatically recognizing and replicating the source data’s schema into your destination.
Let’s see how to read Azure MySQL in Snowflake using Hevo.
Step 1: Configure Azure MySQL as Your Source
Prerequisites
Follow the steps to configure your source:
- Click on PIPELINES in the Navigation Bar.
- Click on +CREATE.
- On the source page, search for Azure MySQL and select it as your data source.
- On Configure Azure MySQL as your source page, provide mandatory details for configuring your connection settings.
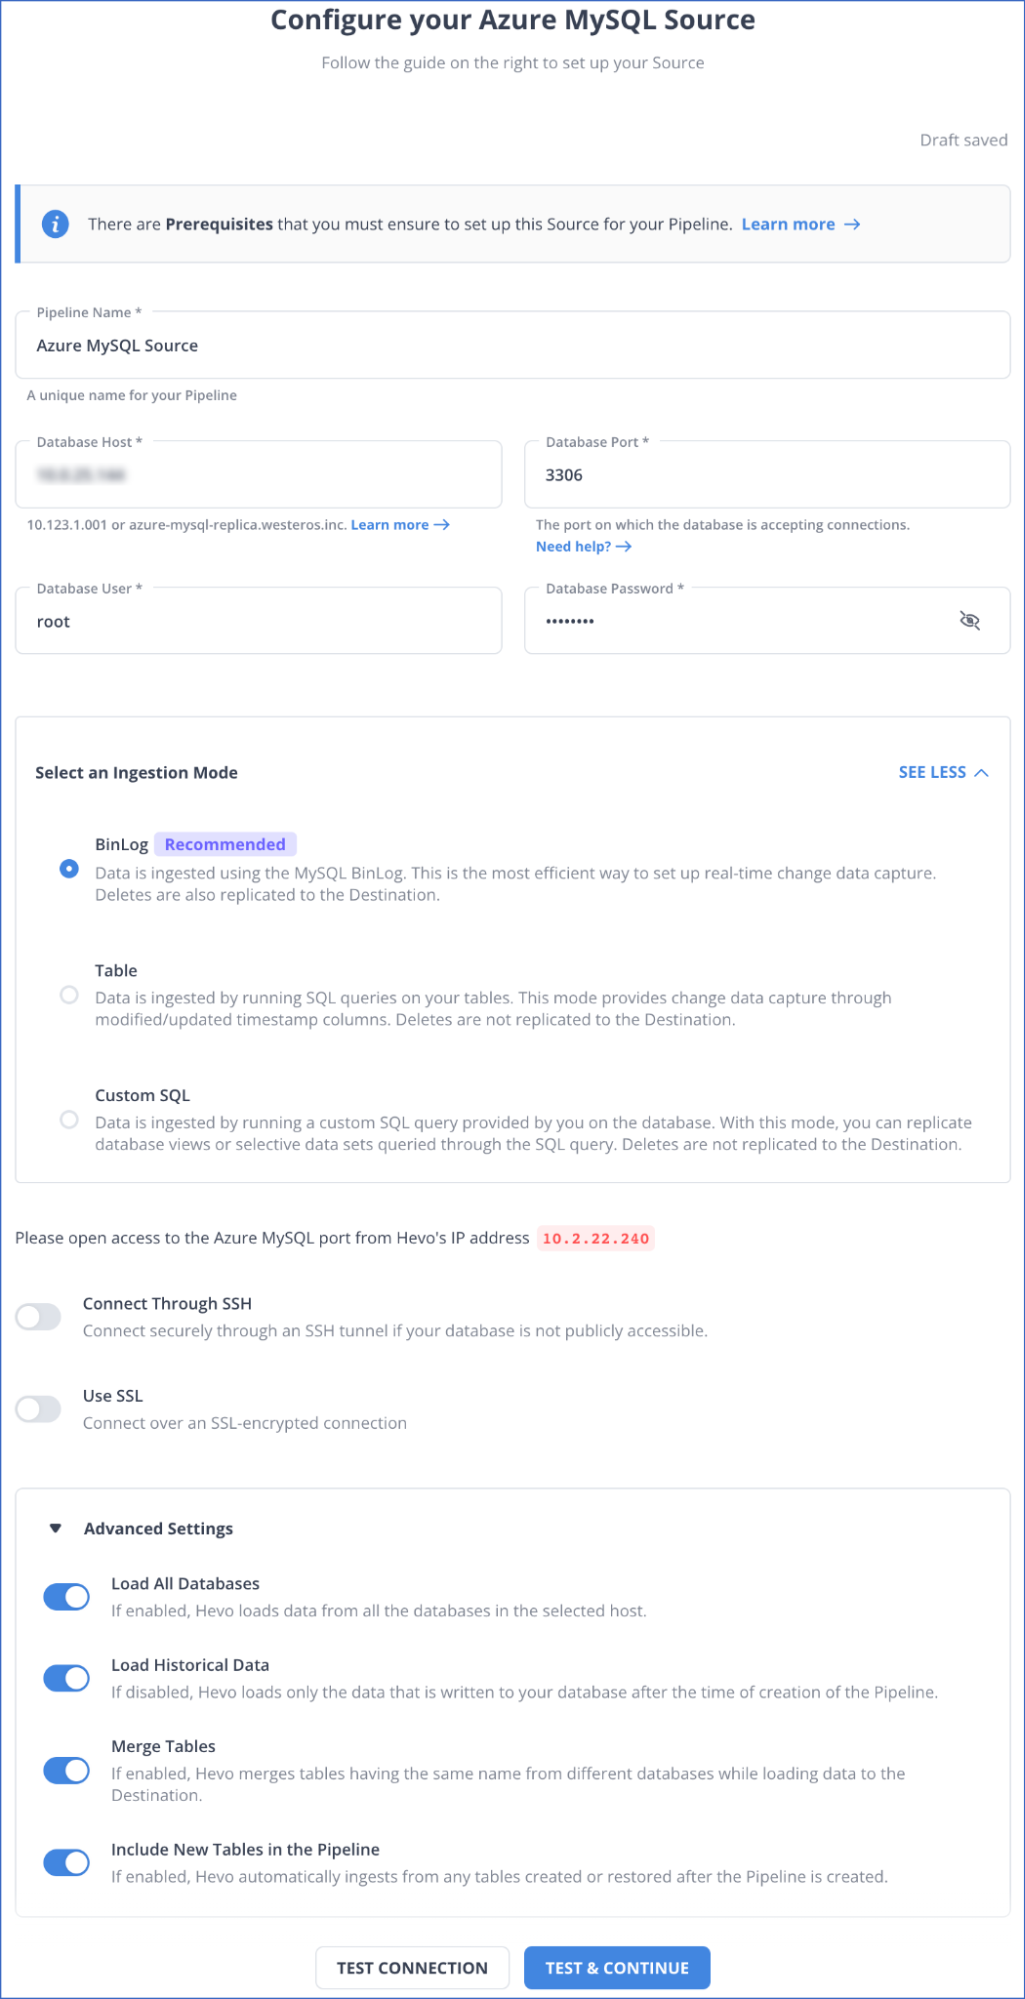 Azure MySQL to Snowflake: Configure your Source Settings
For more information, refer to the Hevo documentation on configuring Azure MySQL as your source.
Step 2: Configure Snowflake as Your Destination
Prerequisites
- Create a Snowflake account that should be active.
- Create your Snowflake warehouse.
- You must have either SECURITYADMIN or ACCOUNTADMIN role in Snowflake to generate a new role or Hevo.
- Hevo must be assigned USAGE and CREATE SCHEMA permissions on databases.
- Hevo must be assigned USAGE, MONITOR, CREATE, and MODIFY permissions for the current and future schema.
- You must obtain your Snowflake Account URL.
- To create the destination in Hevo, you must be assigned any administrator role except for the Billing Administrator.
Follow the steps below to configure your destination:
- Click on DESTINATIONS in the Navigation Bar.
- Click on +CREATE in the Destination List View.
- On the Add Destination page, search for Snowflake and select it as your destination.
- On Configure Snowflake as your destination page, configure your connection settings by specifying the mandatory details.
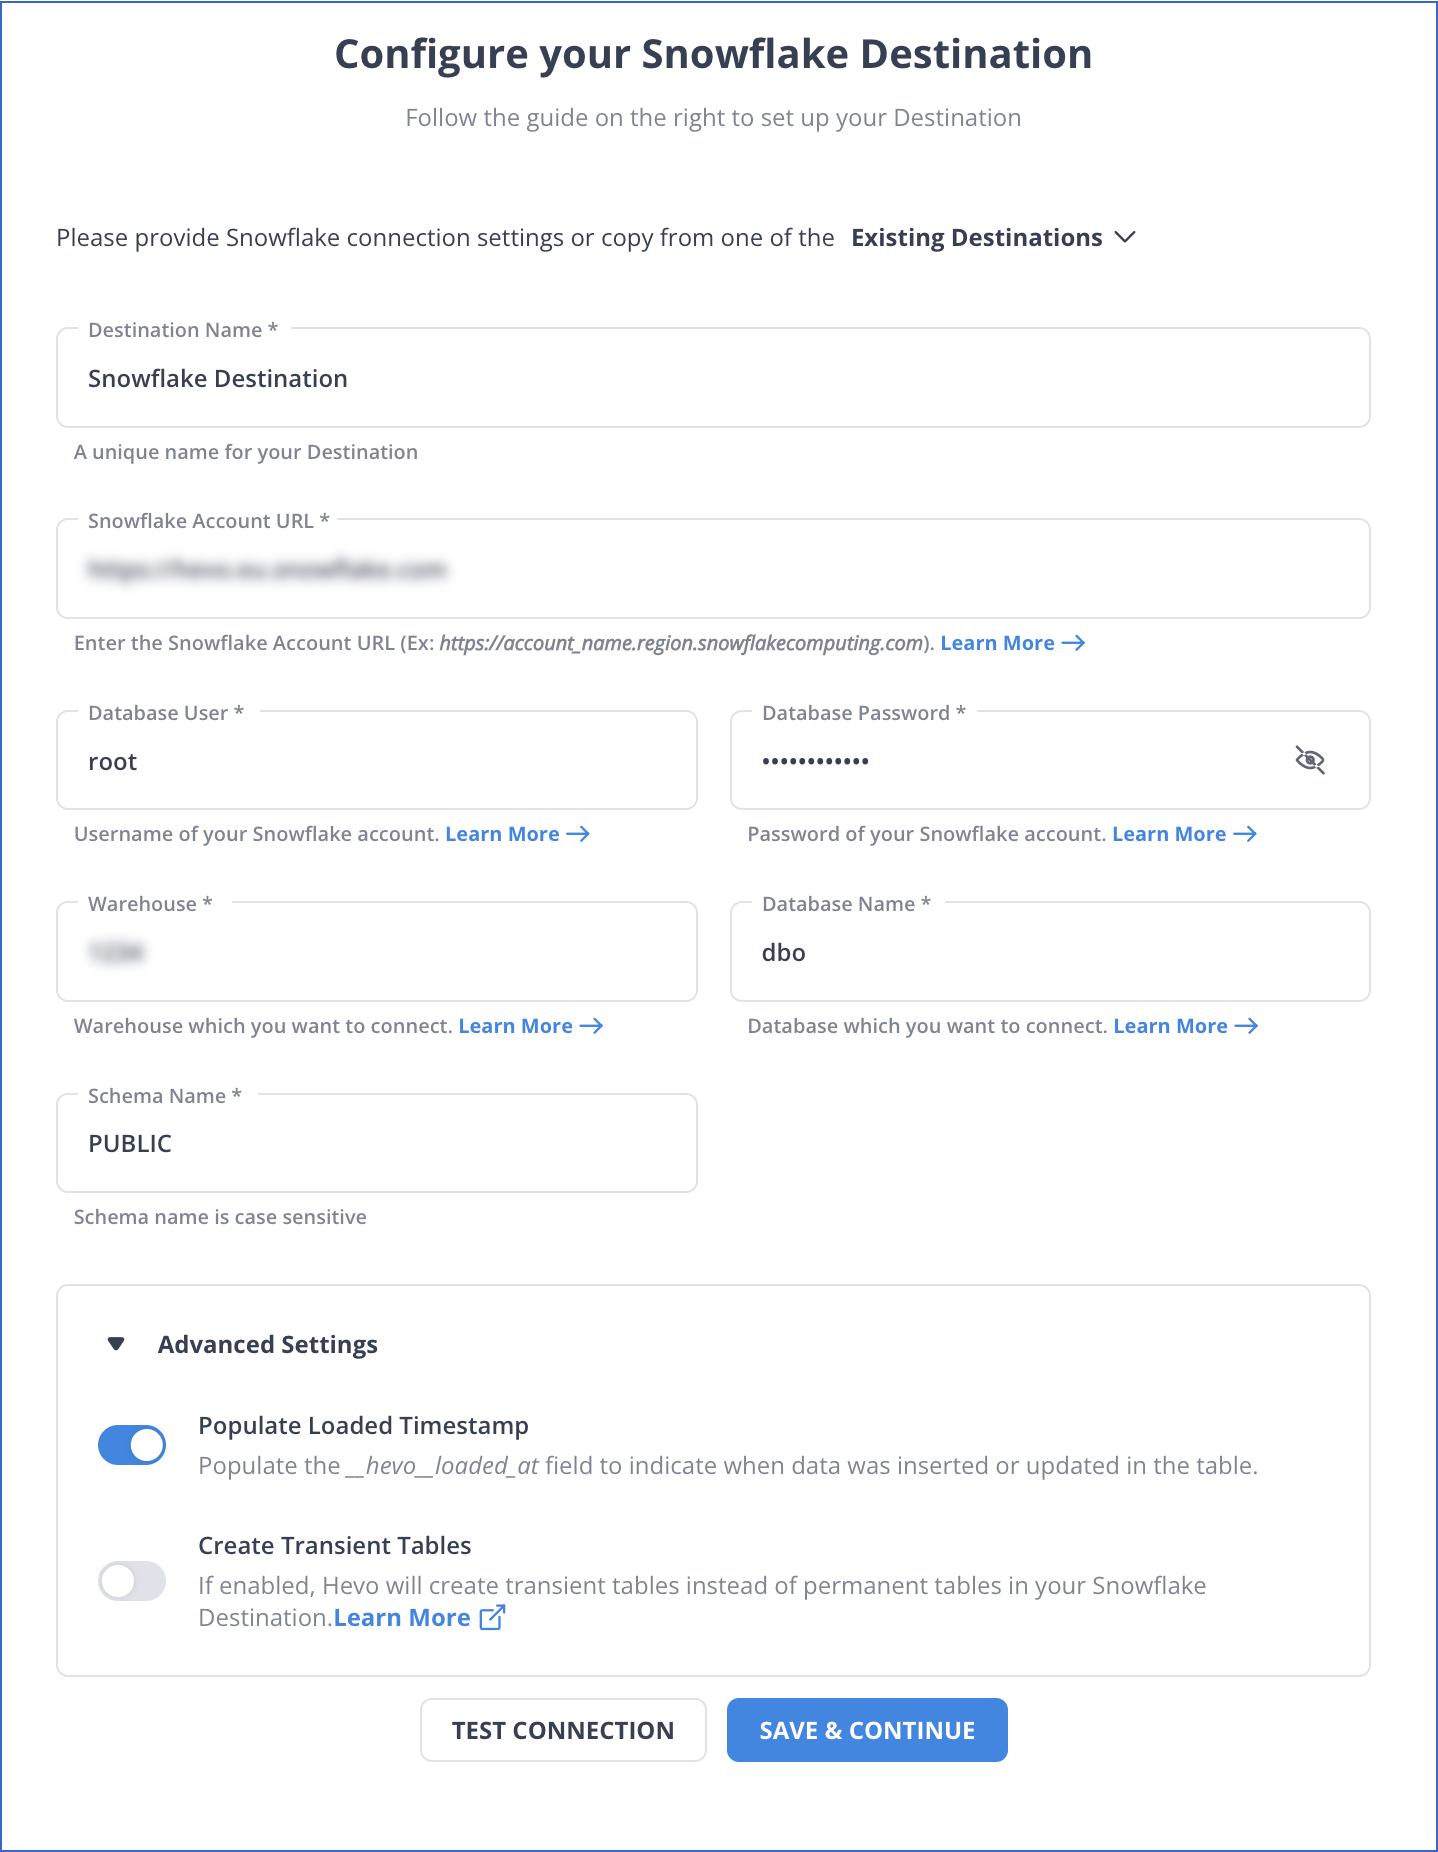 Azure MySQL to Snowflake: Configure your Destination Settings
You can refer to the Hevo documentation to learn more about configuring Snowflake as your destination.
You can also refer to the Azure SQL to Snowflake article to learn how Hevo enables smooth data integration.
Get Started with Hevo for Free
Method 2: Load Data from Azure MySQL to Snowflake Using CSV Files
With this method, you will learn how to load Azure MySQL to Snowflake using CSV Files.
Prerequisites
- Connect your MySQL Workbench to your MySQL database hosted on Azure.
- Provide details on setting the connection, such as the username and password.
Step 1: Export Data from Azure MySQL to a CSV File
First, you must use MySQL Workbench and the Data Export Wizard to export your Azure MySQL data into a CSV file. Then, you can load this CSV file into the Snowflake table using the COPY command.
There are two methods to export data in a CSV file using MySQL Workbench:
Method 1: Using a Data Export Wizard from Object Browser
You can access the wizard from the Object Browser. Go to the Context Menu, right-click on the table you want to export, and then click Table Data Export Wizard.
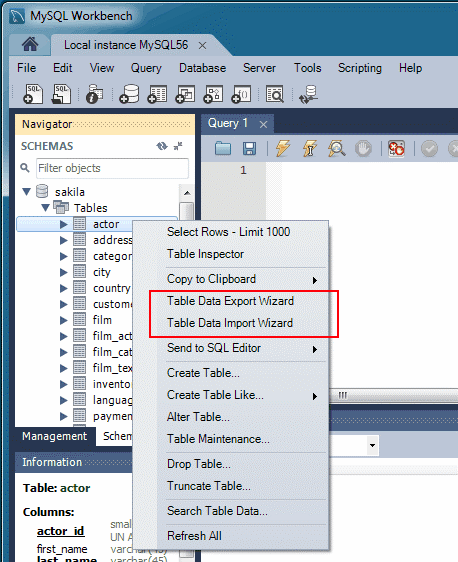 Azure MySQL to Snowflake: Export Table from Azure MySQL Database
Follow the steps to export the table to a CSV file:
- Right-click on the table you want to export.
- Click on Table Data Export Wizard. You can select columns, row offset, and count (if any).
- On Select data for export window, select Next and then choose the file path and CSV file type.
- Also, choose the method for enclosing strings and line and field separators.
- On the Select output file location window, select Next. This will lead to the Export data pane. Select Next to export the table to a CSV file.
Method 2: Using a Data Export Wizard from Navigator Pane
You can access the Data Export Wizard directly from the Navigator pane to export Azure MySQL data to a CSV file.
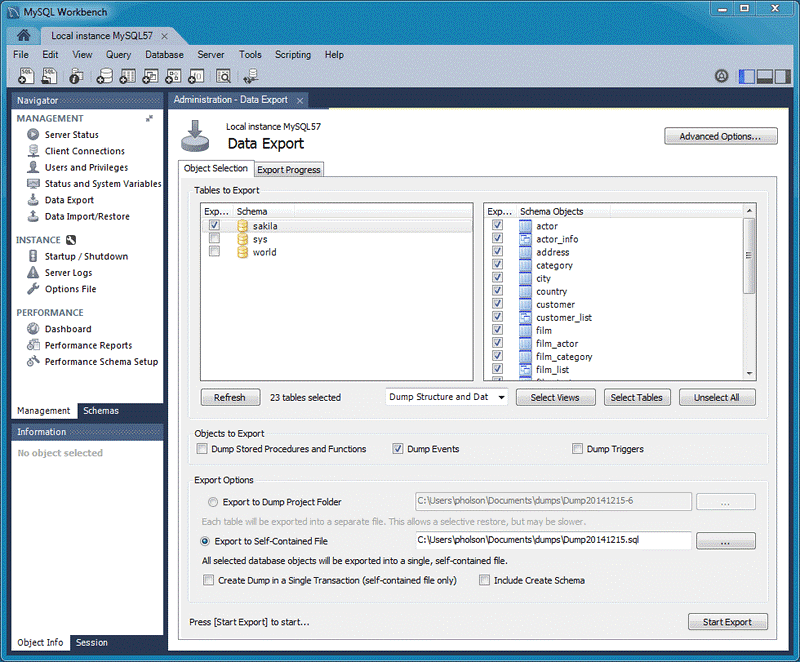 Azure MySQL to Snowflake: Using Export Data Pane to export MySQL data
Follow the steps below to export data from the MySQL database in Azure:
- In the Navigator pane, select Data Export.
- On the Data Export window, select the CSV file schemas you want to export.
- Choose the database object for exporting and configuring the related options.
- Refresh to load present objects.
- Select the Start Export option to start the export process.
Step 2: Export Data from CSV File to Snowflake
You can load your local CSV files into Snowflake using the COPY command.
Prerequisites
- Create a Snowflake account with the necessary privileges to create databases, tables, and objects.
- Install SnowSQL.
Follow the steps below to copy data to target tables in Snowflake:
Create a File Format Object for Your CSV Data
Run the CREATE FILE FORMAT command to create a ‘mycsvformat’ file format.
CREATE OR REPLACE FILE FORMAT mycsvformat
TYPE = 'CSV'
FIELD_DELIMITER = '|'
SKIP_HEADER = 1;
Create the Stage Objects
Execute the CREATE STAGE command to create a ‘my_csv_stage’ stage.
CREATE OR REPLACE STAGE my_csv_stage
FILE_FORMAT = mycsvformat;
Stage Your CSV Data Files
You must use the PUT command to upload your sample data files from the local system to the stage you created earlier.
For Linux or macOS
PUT file:///tmp/load/contacts*.csv @my_csv_stage AUTO_COMPRESS=TRUE;
For Windows
PUT file://C:\temp\load\contacts*.csv @my_csv_stage AUTO_COMPRESS=TRUE;
Copy the Data in the Target Table
Execute the COPY INTO<table> to load the staged data to the target table. This example uses contact information uploaded to Snowflake.
COPY INTO mycsvtable
FROM @my_csv_stage/contacts1.csv.gz
FILE_FORMAT = (FORMAT_NAME = mycsvformat)
ON_ERROR = 'skip_file';
After copying data to the target tables, you must remove copied data files from the intimidatory staged table using the Remove command.
Limitations to Load Azure MySQL to Snowflake Using CSV Files
- When using the Data Export Wizard to export data to a CSV file, you must manually set up configuration options like separators and mapping. This can be confusing if you are unfamiliar with the wizard’s functionalities.
- If the COPY command skips files when loading the staged CSV file into the target table, errors, losses, and inconsistencies are generated. These losses and inconsistencies can be especially challenging when dealing with large datasets.
Use Cases
- Operations Optimization: Integrating data from Azure MySQL to Snowflake enables you to set up automated alerts, dashboards, and reports within Snowflake. It helps you detect anomalies and take proactive steps to address them promptly.
- Advanced Analytics and Machine Learning: Snowflake supports programming different languages, such as SQL, Python, R, etc. Using these languages, you can perform advanced analytics tasks on Azure MySQL data, such as analyzing historical data to recognize trends and patterns.
Conclusion
Migrating data from Azure MySQL to Snowflake allows you to handle your varying workloads efficiently. To export and read Azure MySQL in Snowflake, you can either use Hevo, a third-party data integration tool, or CSV files. Hevo offers automation and real-time capabilities, whereas utilizing CSV files leans towards manual processes.
Want to take Hevo for a spin? Sign Up for a 14-day free trial and experience the feature-rich Hevo suite firsthand. Also checkout our unbeatable pricing to choose the best plan for your organization.
Share your experience of Azure MySQL to Snowflake integration in the comments section below!
FAQs (Frequently Asked Questions)
Q. Is there a method to export MySQL data to Snowflake without a third-party connector?
You can use CSV files to extract data from the MySQL database and move it into your Snowflake tables. However, this process is lengthy.
Q. What are some of the best tools to automate integration between Azure MySQL database and Snowflake?
Hevo is one of the best tools for integrating data between the Azure MySQL database and Snowflake. It is a real-time ELT platform that simplifies your data integration process with its automated data pipeline.
Saloni is a technical content writer, who enjoys writing articles about ML, AI and cloud-based storage platforms. She has experience writing about data integration, and different modern technologies related to this.