

Docker for Data Science: Getting Started & Installing Docker
In the last Docker for Data Science blog we looked at where Docker came from and why it is important. In this blog we will get Docker installed and configured on either Windows or Mac.
Installing Docker.
Below are instructions for installing Docker on both Windows and on Mac.
<important>Before we begin, there are a few different methods for installing Docker on Windows and Mac. I will list out the steps to complete an install with the assumption that you're running Windows 10 or the latest iOS. If you're not then this install may not work. For older versions of Windows and iOS there is a tool called Docker Toolbox. If you have this or any VirtualBox software installed, installing Docker for Windows will prevent these from running. </important>
The following steps will install the following on your development machines:
The Docker Engine
Docker CLI tool
Docker Compose
Docker Machines
Kitematic
Installing Docker on Windows:
Download the latest stable version of Docker - https://download.docker.com/win/stable/Docker%20for%20Windows%20Installer.exe
Open the installation and run. Click through all the prompts
Docker will ask which version should it install Docker for Windows or Docker for Windows (Linux).
Check the Linux version.
Docker should now be installed.
You can work with Docker from a number of different command line tools. Either open PowerShell, CMD or Git Bash and type Docker --version
Validate that Docker has installed as expected.
You're now ready to run our first application. Hello-World!.
Installing Docker for Mac:
Double-click the DMG file, and drag-and-drop Docker into your Applications folder.
You need to authorize the installation with your system password.
Double-click Docker.app to start Docker.
The whale in your status bar indicates Docker is running and accessible.
Docker presents some information on completing common tasks and links to the documentation.
You can access settings and other options from the whale in the status bar. a. Select About Docker to make sure you have the latest version.
Your first Docker application. Hello-World.
You should have Docker installed on your operating system and be ready to go. You confirm that it was up and running using <b>docker --version</b>. Now it is time to run our first application.
Validate install
Open the command line (or nay other command prompt. PowerShell works really well) on windows or terminal on Mac and enter:
Docker run hello-worldYou will begin to see a few lines of comments appear in the terminal window.
Unable to find image 'hello-world:latest' locallylatest: Pulling from library/hello-worldThen finally you should be greeted by a nice message, "Hello from Docker!".
With this we know that Docker is up and running.
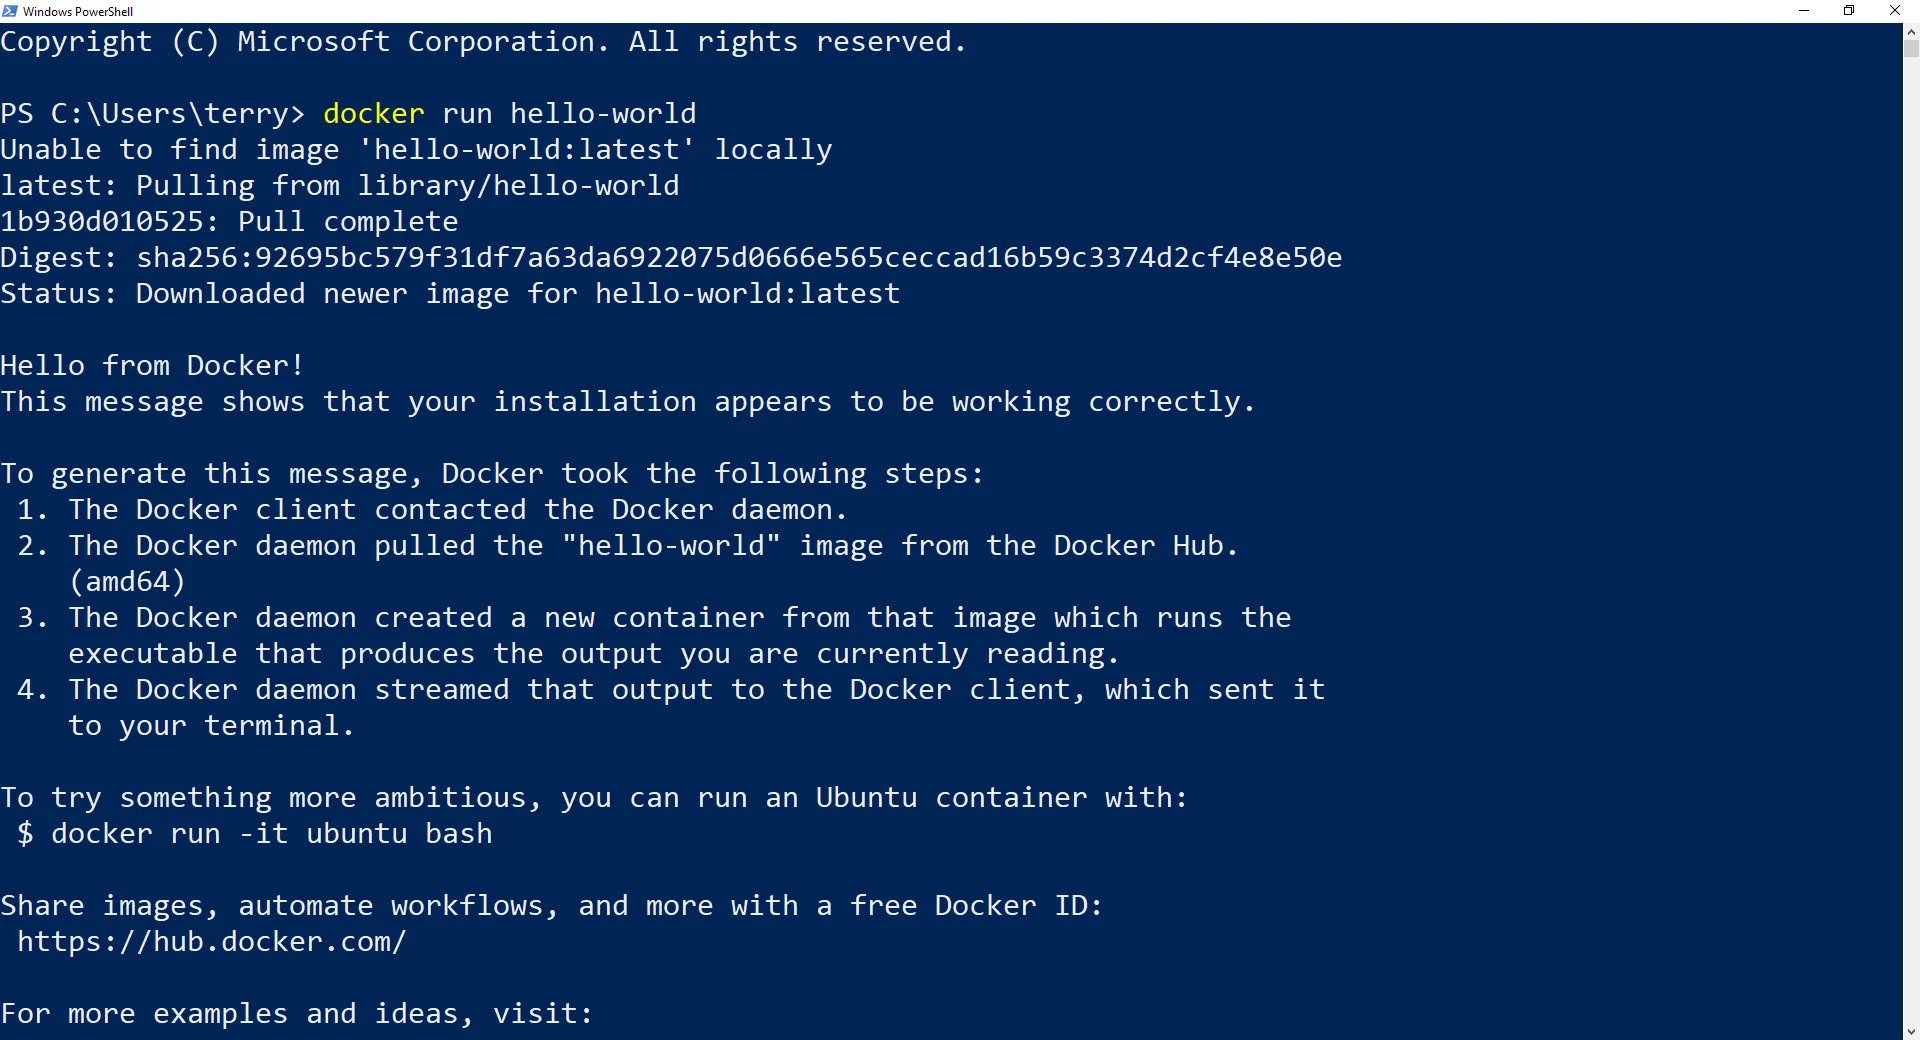
Now let's look back to the comments it chucked at us. "Unable to find images 'hello-world:latest' locally. There is a lot happening in the one statement. The first is the mention of images. In the last blog we discussed how a container is a running version of an image. We asked to run 'hello-world' however the terminal tried to find 'hello-world:latest'. The :latest is a tag. This is looking for the latest deployed version. Where is it deployed? It is deployed to a public container registry.
A few handy commands to get you started
See which containers are running.
docker psSee which images we have built or pulled
docker imagesStop a container running
docker stop <container id>Remove an image
docker rmi <image id>To put some of these in action, we will remove the version of hello-world we just pulled.
Run docker images, and you should see the version of hello-world. This container does not need to be stopped. It is stop automatically after it displays its greeting. to remove the image we run a rmi command.
docker rmi hello-world -fThis should have removed the image. -f is Force. This will make sure it is removed.

In the next blog we will deploy a web application to Docker. The reason I want to show you this is because it is much better hello-world!. We get to see all the components, build an image from scratch and get it running.