
As DoorDash’s business grows, engineers strive for a better network infrastructure to ensure more third-party services could be integrated into our system while keeping data securely transmitted. Due to security and compliance concerns, some vendors handling such sensitive data cannot expose services to the public Internet and therefore host their own on-premise data centers. To integrate with such vendors, the DoorDash core-infra team needed to improve existing network layers and find a solution to bridge DoorDash microservices and on-premise data centers.
In this post, we will discuss how we established a secure, stable, and resilient private network connection between DoorDash microservices and our vendor’s on-premise data centers by leveraging the network facilities from our cloud provider, Amazon Web Services (AWS).
Subscribe for weekly updates
Case study: adding additional payment processors
DoorDash payment service plays a vital role in our business logic since it involves customers, Dashers (our name for the delivery drivers), and merchant services. The data transfer between DoorDash and payment processors needs to be encrypted to protect customers’ privacy and sensitive data. It also needs to be reliable so that DoorDash can always process orders from customers, which is a necessity in running our business.
Originally, only one payment processor was supported at DoorDash, which became a single point of failure in our checkout flow. Any unexpected outages from this single payment processor could prevent DoorDash from fulfilling orders. To mitigate this vulnerability, the payment service team wanted to introduce payment processing redundancy by adding additional payment processing vendors.
The challenge with achieving payment redundancy is that our infrastructure only supported a subset of vendors that can serve public traffic. For other vendors hosting services in on-premise data centers, there was no existing solution to connect. The following sections will discuss how our team established network connections with such vendors.
Finding the right approach to establish network connections
DoorDash’s infrastructure is primarily based on AWS, which means we need to bridge infrastructure and vendors' on-premise data centers. As discussed in the previous section, our forward-looking payment processing vendors deployed their servers in on-premise data centers, instead of the cloud, to ensure that they have total control over data storage and transfer. To adopt a new payment processor with such vendors, we need a secure network connection between DoorDash’s AWS cloud and our payment processing vendors’ on-premise data centers.
We considered two common approaches for linking on-premise data centers with the AWS cloud: Site-to-Site VPN and Direct Connect. Our team is committed to developing high-quality infrastructure with a focus on security, stability, and resiliency, and we use the same principles to determine the best approach for building this connection.
Choosing the best network connection
The Site-to-Site VPN is a kind of connection between multiple networks which communicates and shares resources. Under the hood, the Site-to-Site VPN creates two security IPsec tunnels, where data can be encrypted and transmitted over the public Internet.
The other option Direct Connect, establishes a dedicated private network that links the AWS Cloud and the on-premise data centers, which ensures low transmission delay and stable communication. Additionally, traffic in Direct Connect is not observable from the public Internet.
We eventually choose Direct Connect over Site-to-Site VPN implementation because Direct Connect provides a dedicated fiber link for data transfer, which hides our requests and vendor’s responses from the public Internet. At the same time, it ensures a consistent connection with low latency. In the next part of the article, we will discuss how we implemented this connection and all the hurdles along the way.
Establishing private connections using Direct Connect
Once we understood the requirements and chose the network facility used for establishing the connection between our payment microservice and the third-party payment processor, the next step is to expand our current network infrastructure and implement the Direct Connect solution.
The Direct Connect network link is based on dedicated ethernet fiber-optic cables instead of the public Internet. Establishing a private connection using Direct Connect between DoorDash and our payment processing vendor involves three major components:
- DoorDash AWS Accounts: a group of AWS accounts that host Doordash AWS resources such as compute units and network facilities. DoorDash payment service uses Elastic Compute Cloud (EC2) as a compute platform. The EC2 instances are deployed in a virtual network isolated section called Virtual Private Cloud (VPC). The traffic inside VPC is forwarded to a Direct Connect Gateway (DXG).
- Vendor’s on-premise data centers: the vendor’s warehouse which serves payment processing requests from DoorDash. Vendor’s data centers have private links to their own routers which are set up in AWS Direct Connect Locations.
- Direct Connect Location: a high-speed AWS network traffic exchange center that contains both AWS Direct Connect routers and vendor’s routers. AWS Direct Connect routers accept traffic from DoorDash through DXG, and forward the traffic to the desired vendor’s routers.
As shown in Figure 1., the connection between the vendor’s on-premise data center and AWS Direct Connect Location already exists via a physical cross-connection system. Our main focus here is to build up the communication between DoorDash AWS accounts and the vendor’s on-premise data center, which can be achieved in two steps:
- Configure routes inside VPC and expose traffic to DXG
- Pair DXG to AWS Direct Connect Routers inside Direct Connect Location
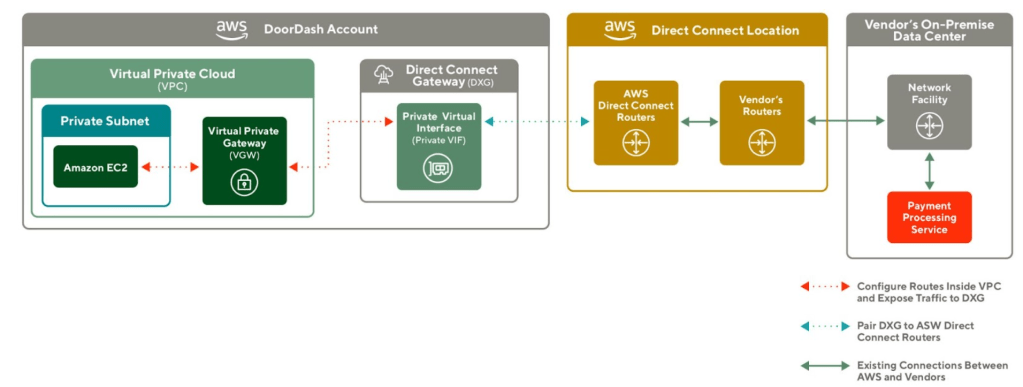
Configuring routes inside VPC and exposing traffic to DXG
The traffic from EC2 needs to go through a Virtual Private Gateway (VGW), then route to DXG via a Private Virtual Interface (Private VIF).
We first created a routing table inside the private subnet of EC2 and directed all traffic destined for the vendor’s payment processing services IP into a VGW. The VGW is a VPC edge router for exposing internal traffic.
# Hashicorp Terraform
# Create a route forwarding traffic to payment processing service via a VPN gateway
resource "aws_route" "doordash_to_payment_processing_service" {
 route_table_id         = "<route_table_id_in_private_subnet>"
 destination_cidr_block = "<ip_address_of_payment_processing_service>"
 gateway_id             = aws_vpn_gateway.doordash_vgw_of_payment_service_vpc.id
}
Then we associated the VGW in our VPN to the DXG in our AWS account, and provisioned a Private VIF which is a network interface used for bridging VGW and DXG.
# Hashicorp Terraform
# Associate the VGW in our VPN to the DXG
resource "aws_dx_gateway_association" "vgw_to_dxg" {
 dx_gateway_id               = aws_dx_gateway.doordash_dxg.id
 associated_gateway_id       = aws_vpn_gateway.doordash_vgw_of_payment_service_vpc.id
}
Pairing DXG to AWS Direct Connect Routers
AWS Direct Connect Location uses a configurable private Autonomous System Number (ASN) to identify DXG. Therefore, we needed to bind a DXG with an ASN allocated by our DoorDash AWS account.
# Hashicorp Terraform
# Bind a DXG to a AWS ASN
resource "aws_dx_gateway" "doordash_dxg" {
 name            = "<direct_connect_gateway_name>"
 amazon_side_asn = "<aws_asn_will_be_allocated_to_the_dxg>"
}
The ASN alone is not enough for identifying connections since DXG might contain multiple Private VIFs, we also need to specify which Private VIF is the desired traffic accepter.
# Hashicorp Terraform
# Specify DXG id and private VIF id to accept connection from AWS Direct Connect Location
resource "aws_dx_hosted_private_virtual_interface_accepter" "private_vif_to_dxg" {
 virtual_interface_id = "<private_virtual_interface_id>"
 dx_gateway_id        = aws_dx_gateway.doordash_dxg.id
}
Once the connection was set up, the DoorDash cloud would be able to send requests to a Direct Connect Location via DXG, while our vendor’s on-premise data center will be able to receive requests from the same Direct Connect Location.
Advertising public IP addresses via Private VIF
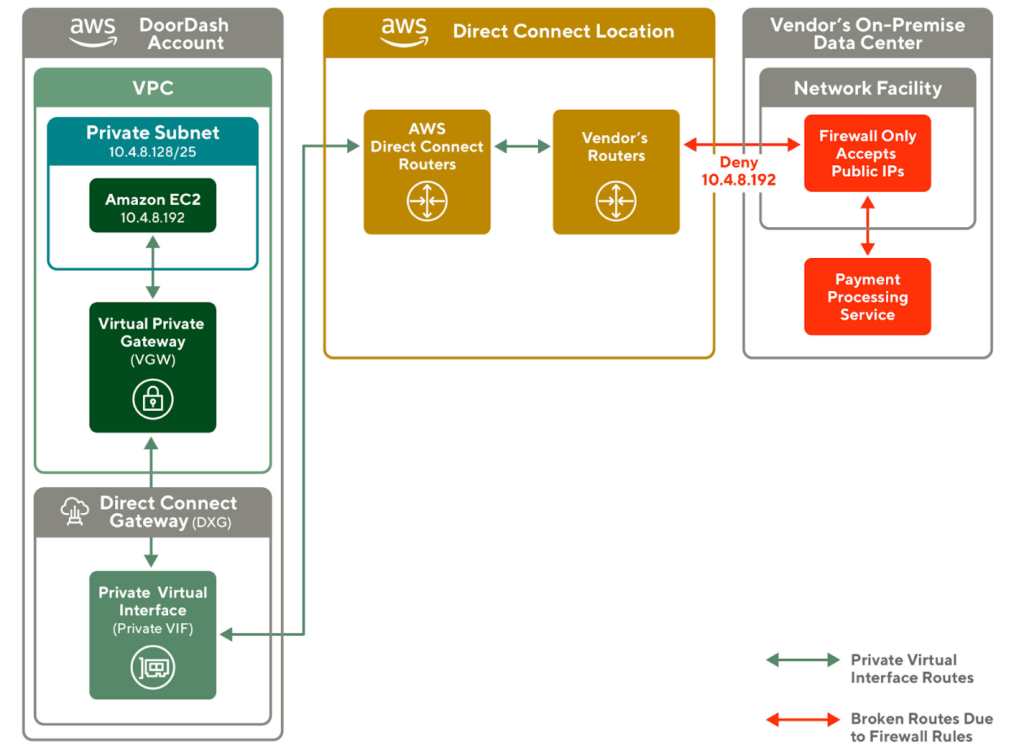
As mentioned above, we built the network path from our microservices to the Direct Connect Location, and the requests got exchanged to the on-premise data center. The next step is to test if requests can actually reach our vendor’s payment processing services. However, when we first initiated requests to the destination IPs, all our requests got timed out.
The network engineers from our vendor notified us that the request was blocked by their network firewall. As shown in Figure 2., the vendor’s on-premise data center enables a couple of network firewall rules. One of the rules is rejecting any packets coming from the private Classless Inter-Domain Routing (CIDR) range, 10.0.0.0 to 10.255. 255.255 (Class A), 172.16.0.0 to 172.31. 255.255 (Class B), or 192.168.0.0 to 192.168. 255.255 (Class C). This rule ensures the request received in the vendor’s on-premise data center is from external sources. This is also because the vendors' systems are multi-tenant and need to allow multiple organizations to connect to their environment using unique and public IPs.
As shown in Figure 3., to solve this problem, our first attempt is to create a NAT Gateway in a public subnet, aiming to convert our outbound requests to a public Elastic IP address. However, when our traffic goes through the Private VIF, its source IP address gets converted to an internal IP in Class A private CIDR unexpectedly. This means the packet still fails the firewall rules.
The root cause of this issue is that the Private VIF in VGW didn’t capture the Elastic IP address of the NAT Gateway, causing all of our outbound traffic to come from a private CIDR range. Since the vendor’s firewall only accepts traffic from public IP addresses, it is still denying all our requests.
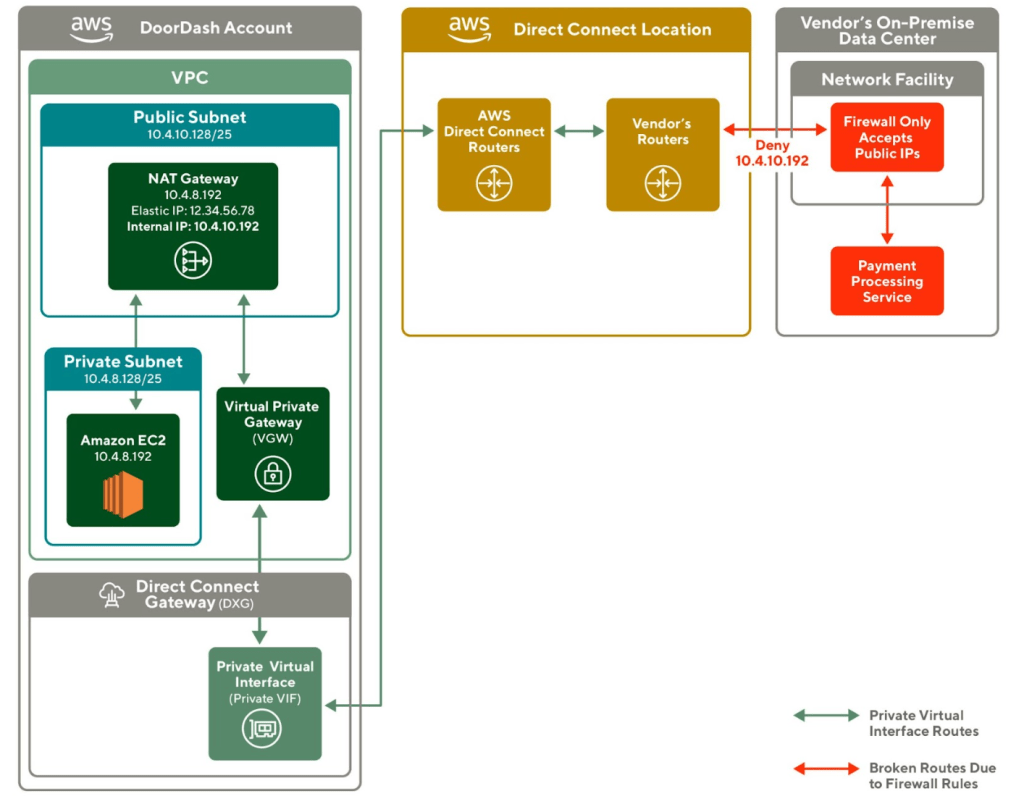
After discussing with AWS architects, we found that VPC can have a secondary CIDR block where we can configure a Public CIDR though it is not publicly advertised and allocated for use within the VPC. We can then have a private subnet with the public CIDR block assigned and it can host a private NAT gateway which then uses a public IP address to perform network address translation. This means that outbound traffic sent through this private NAT gateway can attach to a public CIDR range. It is now able to pass through the vendor firewall with a public IP address
We soon amended our infrastructure shown in Figure 4., deploying a private NAT gateway in a separate private subnet within the same VPC. The new private subnet will associate an IP with a public CIDR range, which allows the private NAT gateway to translate the packet source IP to a public internal IP that the NAT gateway is assigned to.
# Hashicorp Terraform
# Create a private subnet with a public IP cidr range
resource "aws_subnet" "private_subnet_with_public_cidr" {
 vpc_id            = "<id_of_vpc_that_the_subnet_will_be_created_in>"
 cidr_block        = "<public_cidr_block>"
 availability_zone = "<availability_zone>"
}

# Create a private NAT gateway inside private subnet
# Outbound traffic uses one of the IPs in <public_cidr_block> as source address
resource "aws_nat_gateway" "private_nat_gateway" {
 connectivity_type = "private"
 subnet_id         = aws_subnet.private_subnet_with_public_cidr.id
}
Now that we have successfully bound our outbound requests to a public IP which is allowed in our vendor’s firewall. We want to extend the VPC and DGX setup in production.
Supporting connections from multiple environments
At DoorDash, we manage our staging and production environments in two different AWS accounts, one for staging and one for production. One obstacle when setting up this network route in the production environment is that our payment processor vendor can only manage one connection for DoorDash. This means we need to find a way for our staging and production accounts to share the same Direct Connect.
To support Direct Connect sharing, our team collaborated with the security team to review our configuration and decided to populate such infrastructure into our production account. As shown in Figure 5., for the ease of network routing management, we decided to combine the Direct Connect Gateway into our central networking account, and leverage AWS Transit Gateway for cross-account traffic interconnect.
We deployed a Transit Gateway in our central connection account and attached it to both our production and staging accounts. Additionally, we set up a Network Access Control List (NACL) in our central VPC. A Network Access Control List allows or denies specific inbound or outbound traffic at the subnet level. It ensures that only our vendor’s requests and responses IP addresses can go through Direct Connect.
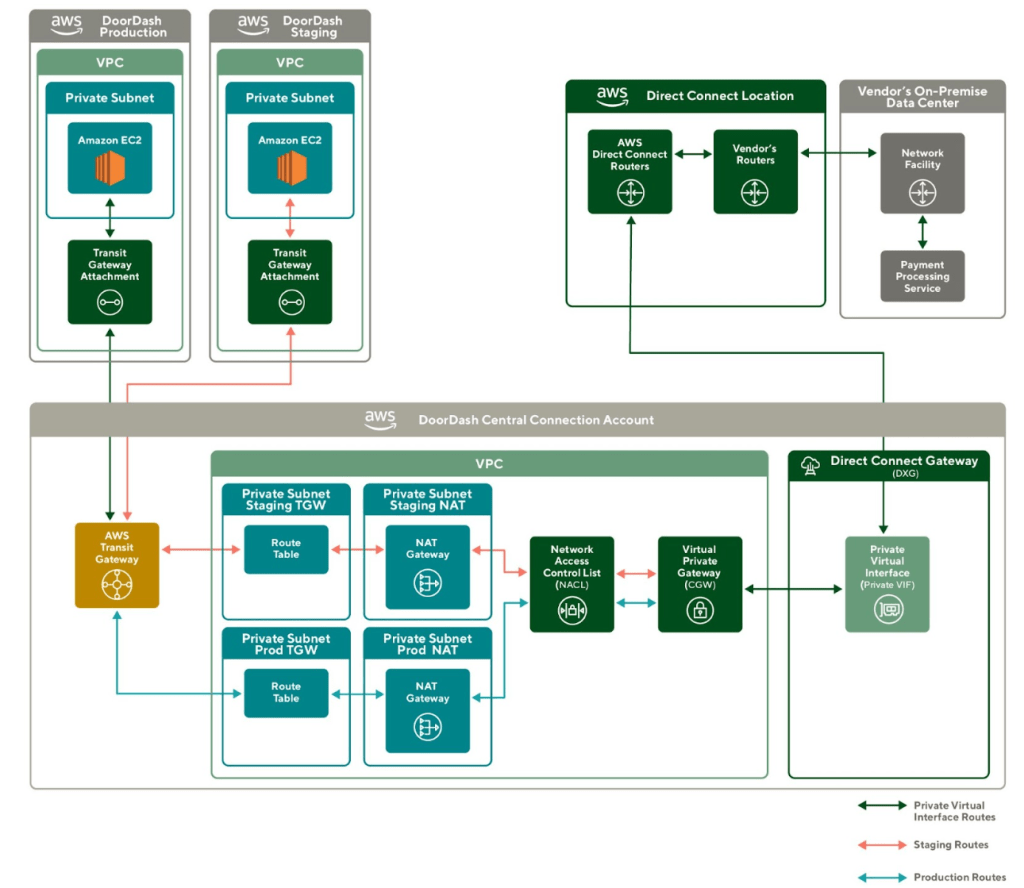
Following the pattern in Figure 5., the secure connections between DoorDash cloud and the vendor’s on-premise payment processing service can span across staging and production environments.
Conclusion
By utilizing network components such as Direct Connect and NAT Gateway, we successfully bridged DoorDash’s cloud resources to our vendor’s on-premise data center. We understand the limitation of the AWS public NAT gateway. It cannot translate an internal IP to an Elastic IP when the traffic goes through a Private VIF.
To enable such translation, we created a private subnet with a public CIDR range and deployed a private NAT gateway in it. This private subnet ensures that the NAT gateway is assigned to a public internal IP, and traffic that goes through it has the source address from a public CIDR range.
This solution demonstrates how our team and security build a private data network path between our cloud resources and an on-premise data center.
Acts and compliance are enforced on web services, such as General Data Protection Regulation (GDPR) and SOC 2, which push businesses to use more secure mechanisms to maintain sensitive customer data. As they adhere to stricter data privacy compliance, more businesses may move existing services to on-premises data centers to ensure single tenancy, perform complete data access audits, and introduce custom hardware to improve data security.
This case study is designed to help midsize businesses that integrate with third-party vendors, such as banking systems and stock exchanges in on-premise data centers, by giving them an example to guide them through the network setup process.
Acknowledgment
Kudos to Lin Du, Luke Christopherson, and Jay Wallace for providing guidance and contributing to this project. Thank you Saso Matejina and Sebastian Yates for initiating this project and providing feedback in this blog post. A shout-out to all members of the infra-sec team, AWS Solutions Architect Anand Gaitonde, and AWS Technical Account Manager Ameet Naik. Last but not least, Ezra Berger for reviewing multiple iterations of this blog post and sharing valuable feedback constantly.
If you are interested in such challenges and want to grow with DoorDash’s infrastructure, please check out the core-infra career page.
Reference
- What is AWS Direct Connect: https://docs.aws.amazon.com/directconnect/latest/UserGuide/Welcome.html#overview-components
- Working with Virtual Interfaces:
https://docs.aws.amazon.com/directconnect/latest/UserGuide/WorkingWithVirtualInterfaces.html - Private VIF and Public VIF:
https://aws.amazon.com/premiumsupport/knowledge-center/public-private-interface-dx/ - Routing Policies:
https://docs.aws.amazon.com/directconnect/latest/UserGuide/routing-and-bgp.html#routing-policies - Direct Connect Gateway:
https://docs.aws.amazon.com/directconnect/latest/UserGuide/direct-connect-gateways-intro.html


 JoshZhu


 WayneCunningham