For those of you who work with managing attachments on a regular basis, you have probably discovered that adding and removing attachments is an involved process. For example, adding and removing attachments from multiple features often requires extra steps and preparation. Those extra steps and preparation may involve renaming files prior to adding them as attachments. In addition, to use the current Add Attachments or Remove Attachments tools, requires a match table.
Some users want to add bulk attachments to multiple features quickly and easily, but current methods to accomplish this have not been available. Data management is a necessary part of eventually providing productive analysis results. However, it can be frustrating when it feels like more time is spent on the former rather than acting on the results of the latter. How nice would it be if we could load or remove attachments quickly by selecting one or more features in the Map view?
In this blog, I will introduce you to two new sample tools that add and remove attachments by selection; no match table needed and no renaming of files. Let’s begin by addressing a workflow that warrants the need for these tools.
Scenario
In our workflow, we need to add the same images to multiple features at the same time. I used the Select By Attributes option to create my selection set. Currently, the software allows you to add multiple attachments to a single feature, but not multiple features. Here is a screenshot that illustrates adding attachments within an editing session:
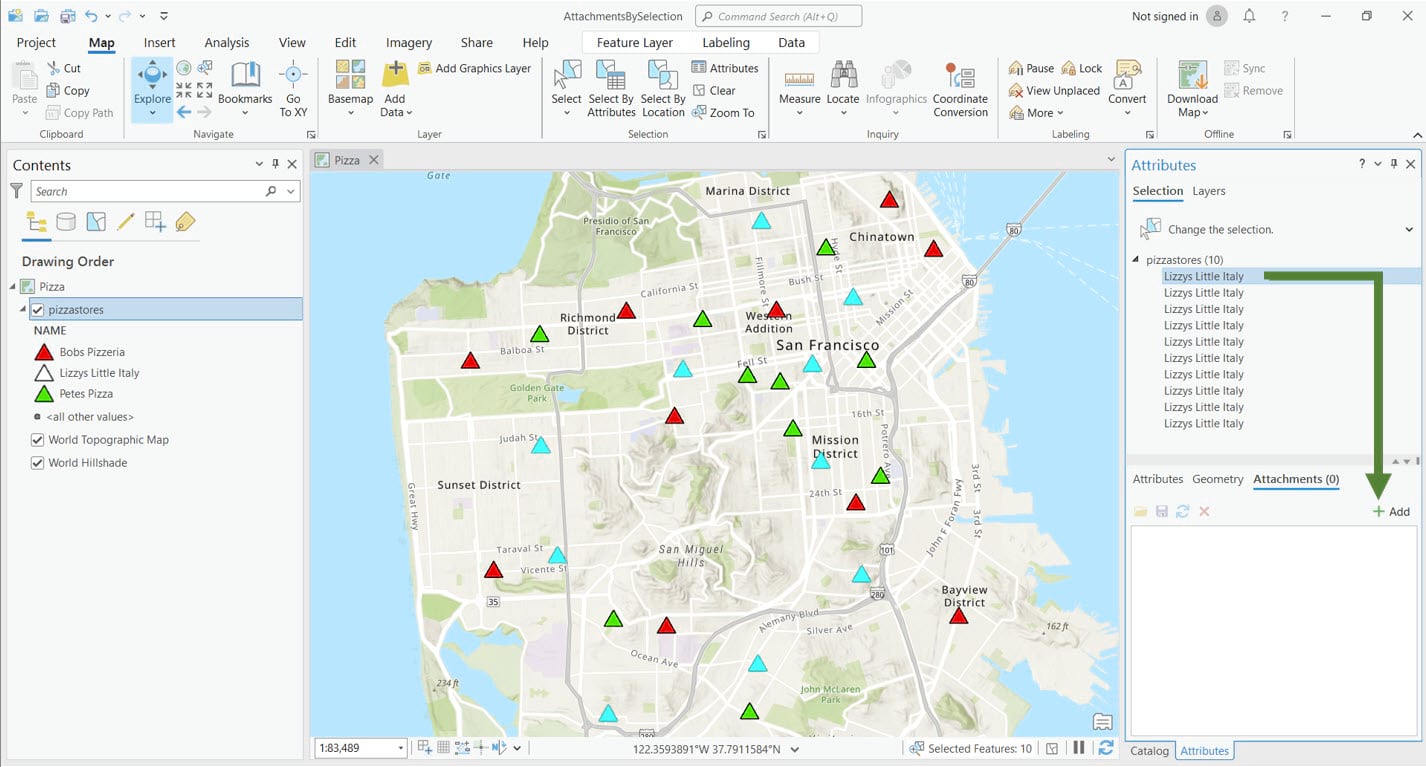
In this editing session, I see the Add attachments option when choosing a selected item from the list in the Attributes pane.
However, I want to add the same restaurant logo to all the selected features at once. Here we see in the next screenshot, that if I select them as a group, the option to add attachments is not available. I have two options to address this. Add the attachment of the restaurant logo one at a time. Or create a match table to add the same image logo to each selected feature using its ObjectID. Either of these could take a significant amount of time, especially if we have many features and files.
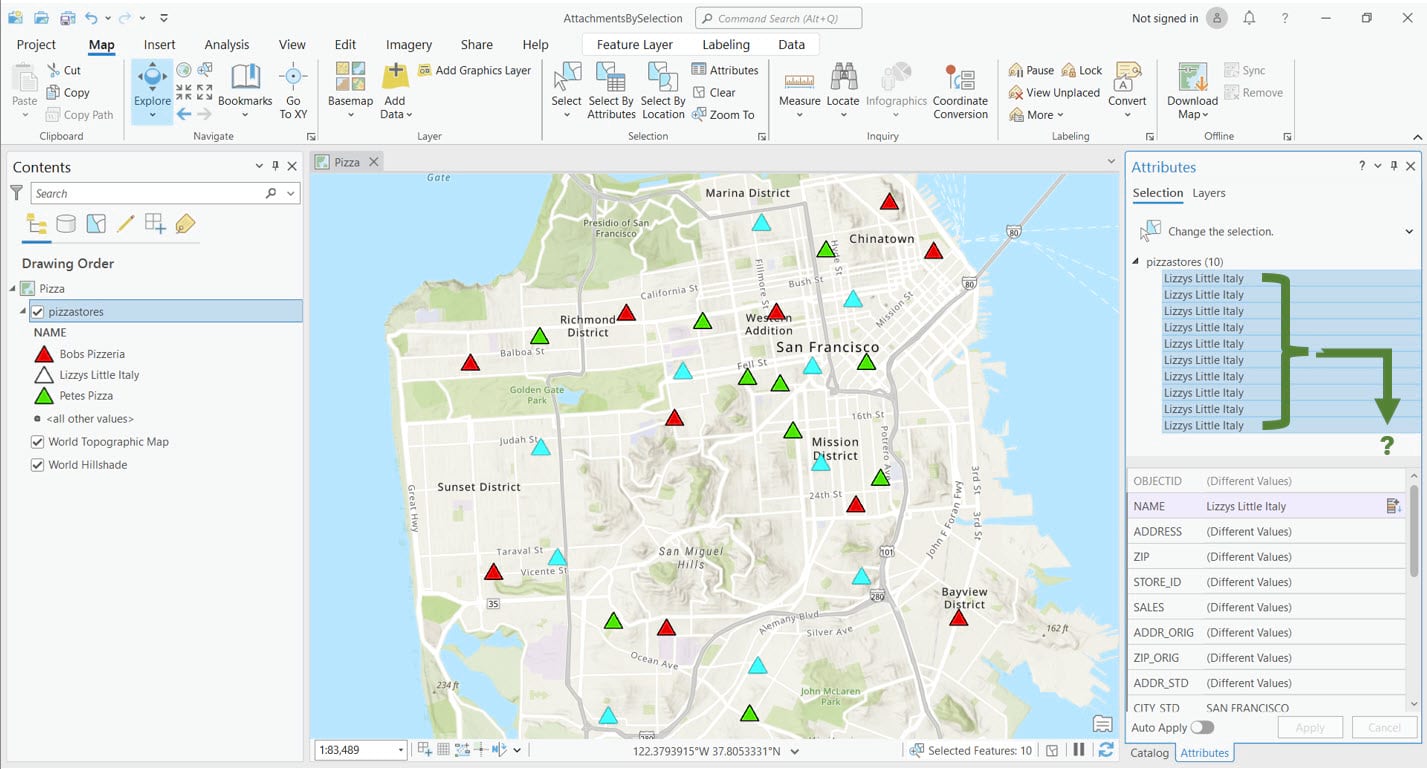
Solution: Sample tools
My Dad used to always say that the job is much easier when you have and use the right tools. In our case, we built these sample tools for this purpose and are happy to share them with you. Let’s learn more about them.
Add Attachments To Selection sample tool
This sample tool will use the selected features and allow you to choose one or more files to attach to them. This results in having all selected files attached to each selected feature. For example, if you choose four image files to load as attachments for four selected features, each feature has the same four images attached.
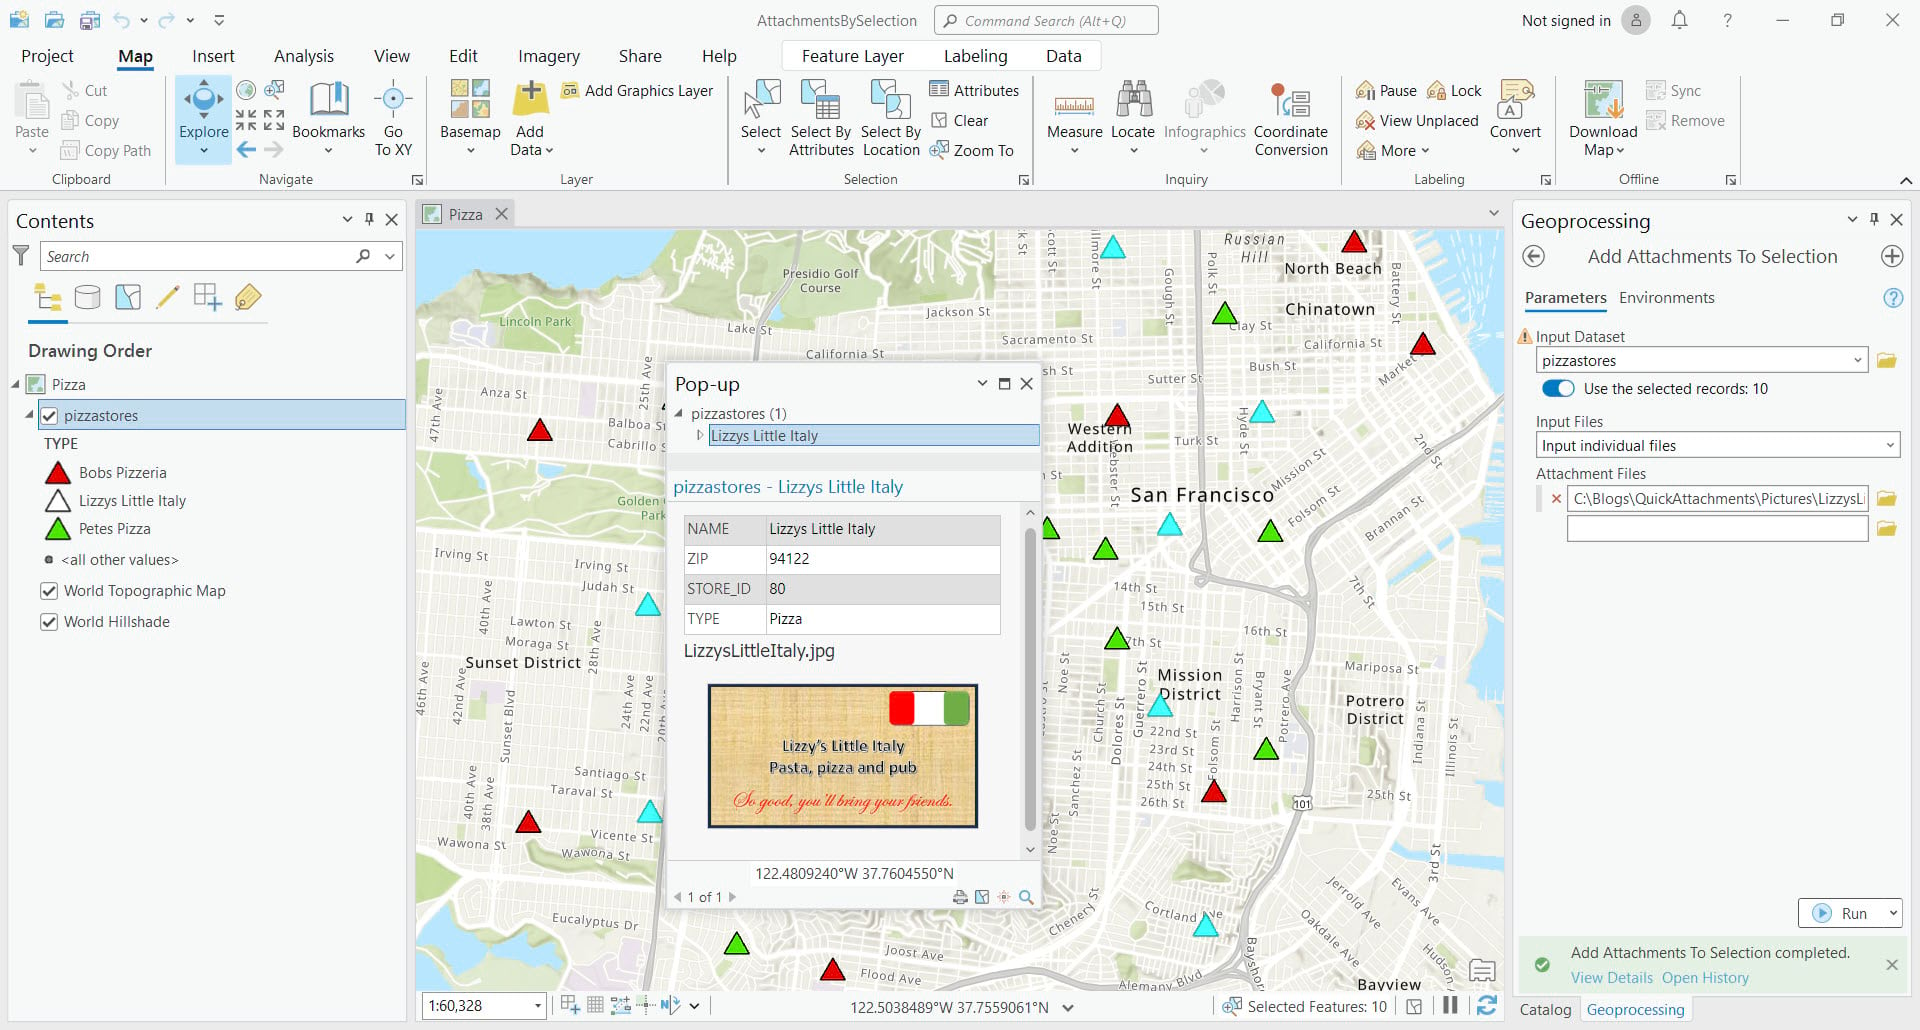
As shown in the scenario screenshots, I want to add the same attachment to all 10 Lizzy’s Little Italy locations. The Add Attachments To Selection sample tool will accomplish this task for me without having to generate a match table. In fact, it will generate its own match table in memory to match the attachments with the selected features.
Let’s review the tool and its parameters. With selections already active in the map, I’ll open the tool, fill in the parameters and provide pertinent information about them.
Input Dataset parameter
The first required parameter is the Input Dataset. This parameter expects the input dataset to be a layer in the Contents pane of the active map with one or more selections. To add the data to the tool, use the down arrow. The tool automatically detects the number of selected records to process during the run operation.
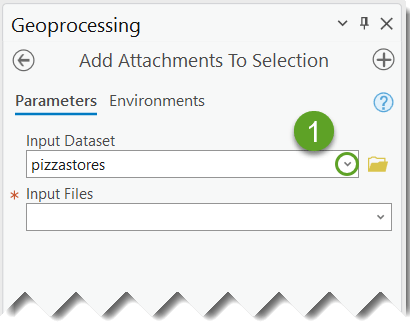

The tool will show a warning indicator next to the Input Dataset parameter with more than one selection. This warning lets you know that each selected feature will have the same selected files attached. We can see the description by placing our mouse pointer on the warning icon. This works for our scenario, as I want the same image logo attached to all 10 locations of Lizzy’s Little Italy.
The tool will also issue the following errors with an error indicator in the same location as the warning icon under the following conditions.
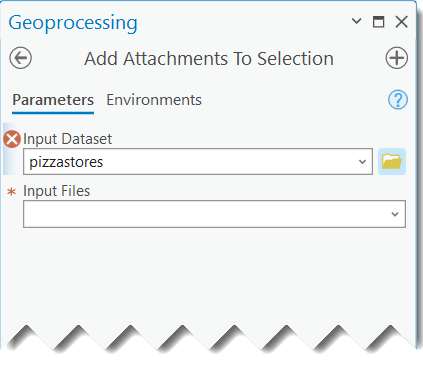
The first error (most common) indicates that the input dataset was selected using the folder 📁 icon. It lets you know you need to choose an input dataset in the active map using the down arrow in the parameter window.

The second error (rare, but still possible) lets you know that a dataset is not in the active map. This occurs when you select an input dataset and then change to another map that does not contain the dataset. The error messages prevent you from running the tool until you resolve the issues as suggested.

With the input dataset entered, we can move to the next parameter to select the files to attach to the selected features.
Input Files parameter
The second parameter provides you with options for where you want to choose files to attach.
-
- Input individual files — One or more files chosen from different locations.
- Input folders with files — One or more folders chosen from different locations and all supported files in each folder are added as attachments.
- Input individual files and folders — If desired, a combination of the first two options allows for many files and folders with files, attaching them to one or more selected features. For example, this option allows you to add a single file from one location, and then add a folder of files from another location.
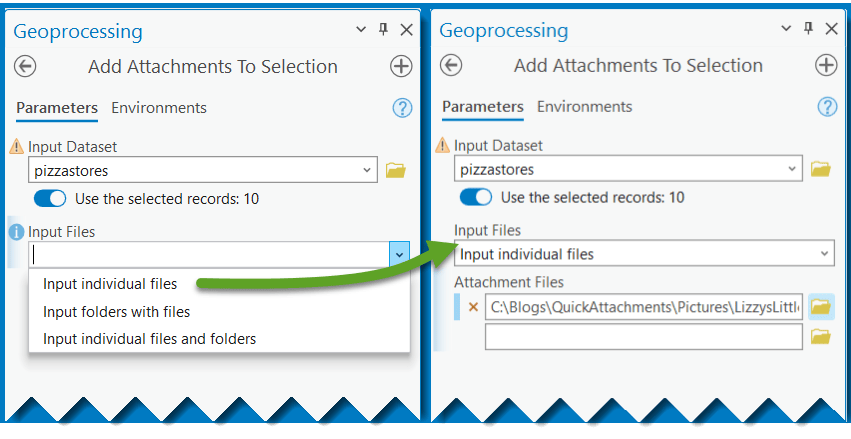
In my case, I only needed to select one file, so I chose the first option. This allowed me to choose one or more files to add as attachments for all 10 of my selected restaurants.
With the parameters all filled in, I was able to run the tool and the logo image for Lizzy’s Little Italy was attached to each of the 10 selected features. I can verify the updates by returning to the map and choosing one of the features to see the attachment in a pop-up window.
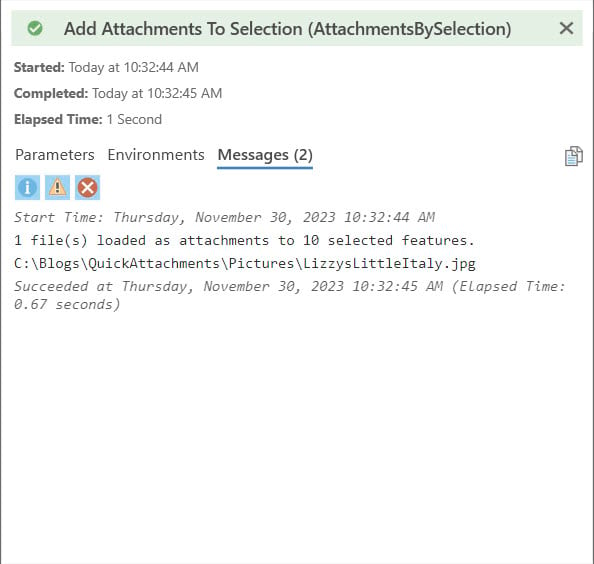
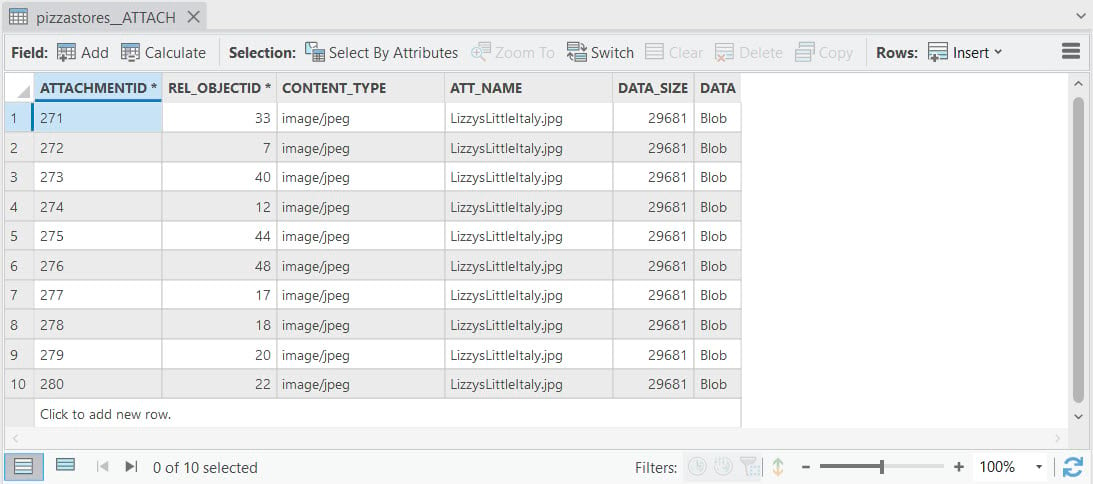
I can also validate the attachments by viewing the completed tool messages or by opening and viewing the pizzastores_ATTACH table. The ATTACH table stores added attachments in a BLOB (binary large object) field.
Optionally, I could now select the other pizza locations and use the tool to add their logo to the selected features to complete the workflow.
Remove Attachments By Selection sample tool
This sample tool does exactly what the name implies — remove attachments by selection. Like the Add Attachments To Selection sample tool, it has the same warnings and errors for the Input Dataset parameter. Choose the input dataset from the active map that has the selected features you want attachments removed. Click Run. But, before we get to removing attachments, let’s also review this tool as well.
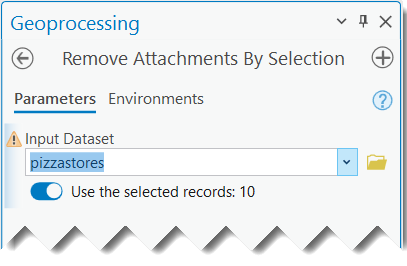
If I keep the current selection for pizzastores, the Remove Attachments By Selection tool will remove all the attachments that I just loaded. Here we see the ATTACH table no longer has any rows of the previous attached files after running the tool with the same selected features.

In short, the Remove Attachments By Selection tool deletes all attachments for all selected features. The tool will also do the following:
- Return an error if the dataset has no selected features.
- This is to prevent deleting all attachments accidentally, without explicitly choosing which selected features to delete attachments.
- If no attachments exist in the ATTACH table, the tool will return an error with a message indicating that no attachments were found to delete.
- If one selected feature has attachments, and another selected feature does not, it will return a successful message that it deleted one attachment, but the other selected feature did not have any attachments to delete.
- If you select one or more features that do not have attachments, the tool will return a warning, that the selected features had no attachments to remove.
FAQ’s
The following are a few things you might want to know about these tools:
- Will they work with traditional and branch versioned datasets? –- Yes and no. The tools were tested with data (feature classes) that use traditional versioning and move-to-base workflows. Branch versioning workflows have not been tested, and are currently beyond the scope of these tools as they do not work with a feature service. For traditional versioning, only users with editing permissions can add or remove attachments. To view the updates, refresh the version on the Versioning tab after adding or removing attachments to see the changes.
- Do the tools have any requirements? –- Yes. The input dataset must be enabled for attachments. The tools will return an error message for any input dataset that has not been enabled for attachments. Currently, the tools also require an ArcGIS Pro Standard license.
- Do the tools work with enabled feature classes for attachments in mobile, file and enterprise geodatabases? –- Yes. The tools support all three geodatabase workspaces.
- Will the tools work with published hosted feature layers in ArcGIS Online? –- No. The tools only support feature classes that have been enabled for attachments in a geodatabase. The tools do not recognize a feature service and will return an error that the data has not been enabled for attachments. Using these tools with a feature service was beyond the scope of these sample tools.
- What is the minimum version of ArcGIS Pro support for these tools? –- It is recommended that you use these sample tools with ArcGIS Pro 3.0 or later to see the selected records message on the tools. These tools were not tested with any version of ArcGIS Pro 2.x.
- Do the tools work with stand-alone tables enabled for attachments? — No. These tools were designed to work with a layer in an active Map View with selected records.
Conclusion
These tools provide an alternative to using the Add Attachments and Remove Attachments tools, as their current design does not recognize selected features to add or remove attachments. We hope that you find these tools to be helpful in assisting your data management workflows as you manage attachments for enabled feature classes in your geodatabases. As with all sample tools they are provided as is. They should work as described but may experience unexpected errors or results. You may alter, update, or improve upon these custom script tools to meet your personal needs.
Download the tools
Download the .zip file that contains both sample tools in an ArcGIS Pro toolbox.
To access the downloaded toolbox in ArcGIS Pro.
- Extract all contents from the .zip file.
- In ArcGIS Pro, Add Folder Connection to the extracted folder.
- The toolbox (.atbx) file should now be visible in the added folder from the Catalog pane.
Resources
Additionally, check out these other helpful resources for data management, Python, and custom script tools:


Commenting is not enabled for this article.